年初的时候就考虑过搭建个在线编辑excel的,之前试过很多owncloud,seafile,nextcloud,kodexplorer
这几天又有需求多人同时在线编辑office文件,同事找了个onlyoffice的用docker跑起来了. dockerhub上看了下镜像挺大的而且没有跳转到github上Dockerfile的超链接
稍微用docker history看了下发现里面一堆各种数据库都放同一个镜像里,根本没有解耦
于是便有了解耦这个镜像的冲动
先找官方的例子跑跑看
地址:https://api.onlyoffice.com/editors/demopreview
看了下官方都是js写的,所以选了个Nodejs的demo来跑,另外之前用docker帮过同学搭建过一个nodejs的小程序后台环境,对nodejs项目部署有点经验
选择 Node.js Example
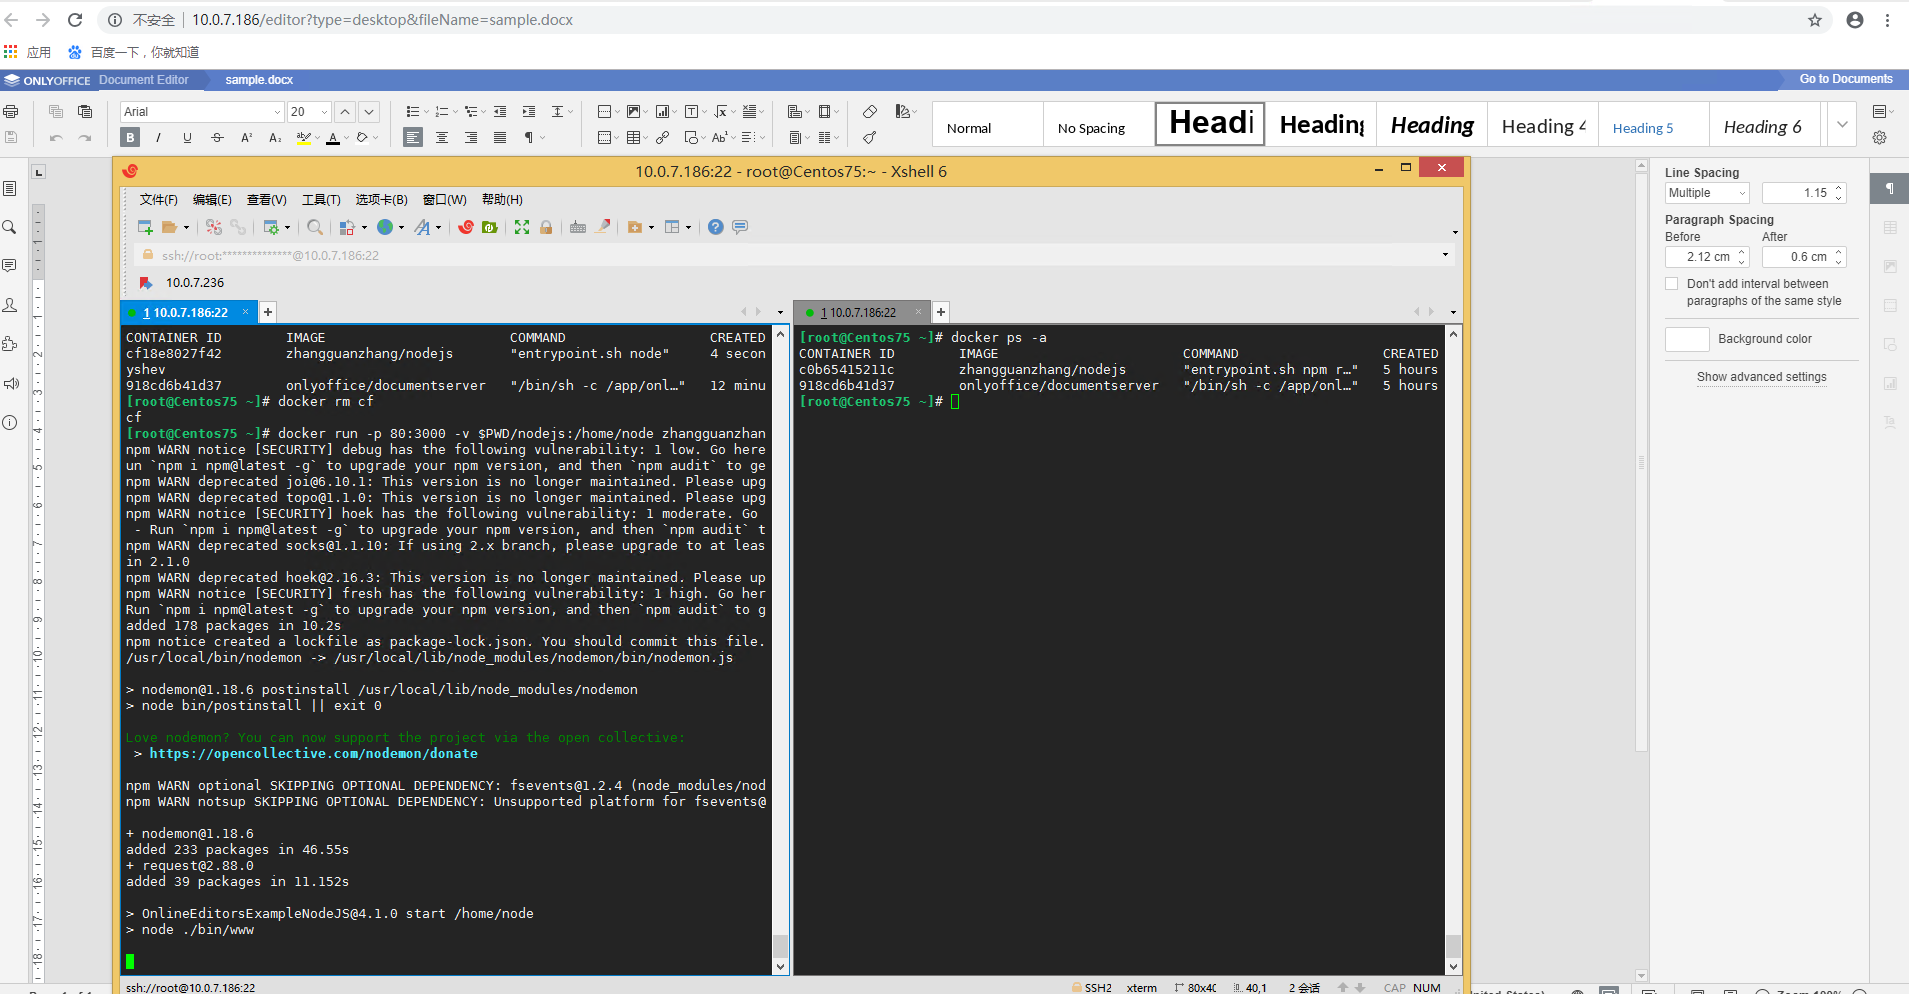
解压后,修改配置config/default.jsonm,siteUrl 为 DocumentServer的地址npm install安装模块node bin/www即可运行起来npm install,这里用我自己的镜像跑(后期npm的模块可以固化到镜像里,这里仅供快速搭建使用方便)
先简单起来一个试试documentserver
1 docker run -d -p 9980:80 onlyoffice/documentserver
然后把修改过后整个demo挂载到镜像的WORKDIR跑起来
然后在官方的仓库找到了Dockerfile,好吧,不用去看docker history --no-trunc了https://github.com/ONLYOFFICE/Docker-DocumentServer/blob/master/Dockerfile
看了下Dockerfile整体过程是下面:
添加nodejs的源用于安装nodejs,安装nodejs,postgres,redis-server,rabbitmq-server,supervisor
然后entrypoint脚本逻辑https://github.com/ONLYOFFICE/Docker-DocumentServer/blob/master/run-document-server.sh
开始执行的是一堆目录的mkdir,chown
1 2 3 ONLYOFFICE_DATA_CONTAINER_HOST=${ONLYOFFICE_DATA_CONTAINER_HOST:-localhost} ... if [ ${ONLYOFFICE_DATA_CONTAINER_HOST} = "localhost" ]; then
然后执行函数read_setting/etc/onlyoffice/documentserver/local.json的值
1
2
3
4
5
6
7
8
9
10
11
12
13
14
15
16
17
18
19
20
21
22
23
24
25
26
27
28
29
30
31
32
33
34
35
36
37
38
39
40
41
42
43
44
{ "services" : { "CoAuthoring" : { "sql" : { "dbHost" : "localhost" , "dbName" : "onlyoffice" , "dbUser" : "onlyoffice" , "dbPass" : "onlyoffice" } , "redis" : { "host" : "localhost" } , "token" : { "enable" : { "request" : { "inbox" : false , "outbox" : false } , "browser" : false } , "inbox" : { "header" : "Authorization" } , "outbox" : { "header" : "Authorization" } } , "secret" : { "inbox" : { "string" : "secret" } , "outbox" : { "string" : "secret" } , "session" : { "string" : "secret" } } } } , "rabbitmq" : { "url" : "amqp://guest:guest@localhost" } }
如下,变量为空就使用文件里的值
1 2 3 4 5 6 7 8 9 10 11 12 13 POSTGRESQL_SERVER_HOST=${POSTGRESQL_SERVER_HOST:-$(${JSON} services.CoAuthoring.sql.dbHost)} POSTGRESQL_SERVER_PORT=${POSTGRESQL_SERVER_PORT:-5432} POSTGRESQL_SERVER_DB_NAME=${POSTGRESQL_SERVER_DB_NAME:-$(${JSON} services.CoAuthoring.sql.dbName)} POSTGRESQL_SERVER_USER=${POSTGRESQL_SERVER_USER:-$(${JSON} services.CoAuthoring.sql.dbUser)} POSTGRESQL_SERVER_PASS=${POSTGRESQL_SERVER_PASS:-$(${JSON} services.CoAuthoring.sql.dbPass)} RABBITMQ_SERVER_URL=${RABBITMQ_SERVER_URL:-$(${JSON} rabbitmq.url)} parse_rabbitmq_url REDIS_SERVER_HOST=${REDIS_SERVER_HOST:-$(${JSON} services.CoAuthoring.redis.host)} REDIS_SERVER_PORT=${REDIS_SERVER_PORT:-6379} DS_LOG_LEVEL=${DS_LOG_LEVEL:-$(${JSON_LOG} levels.nodeJS)}
parse_rabbitmq_url函数从变量local.json里的rabbitmq.url值分离成下面
1
2
3
4
RABBITMQ_SERVER_HOST=$host RABBITMQ_SERVER_USER=$user RABBITMQ_SERVER_PASS=$pass RABBITMQ_SERVER_PORT=$port
也就是把amqp://guest:guest@localhost分离成
1 amqp://${用户名}:${密码}@${host}:${port:=5672}
函数update_log_settings修改$DS_LOG_LEVEL,缺省值为文件的/etc/onlyoffice/documentserver/log4js/production.json的levels.nodeJS
1
2
3
4
5
6
7
8
9
10
11
12
13
14
15
{ "appenders" : [ { "type" : "console" , "layout" : { "type" : "pattern" , "pattern" : "[%d] [%p] %c - %.10000m" } } ], "replaceConsole" : "true" , "levels" : { "nodeJS" : "WARN" } }
然后执行函数update_jwt_settings满足条件就
1 if [ "${JWT_ENABLED} " == "true" ]
JWT_ENABLED缺省为false
接下来pgsql部分,数据存放变量为下
1
2
3
4
PG_ROOT=/var/lib/postgresql PG_VERSION=9.5 PG_NAME=main PGDATA=${PG_ROOT} /${PG_VERSION} /${PG_NAME}
POSTGRESQL_SERVER_HOST缺省用local.json文件里的.services.CoAuthoring.sql.dbhost
1
2
3
4
if [ ${POSTGRESQL_SERVER_HOST} != "localhost" ]; then update_postgresql_settings waiting_for_postgresql create_postgresql_tbl
如果POSTGRESQL_SERVER_HOST不是localhost就用local.json文件里的.services.CoAuthoring.sql.dbhost
1
2
3
4
5
6
waiting_for_connection until nc -z -w 3 "$1 " "$2 " ; do >&2 echo "Waiting for connection to the $1 host on port $2 " sleep 1 done }
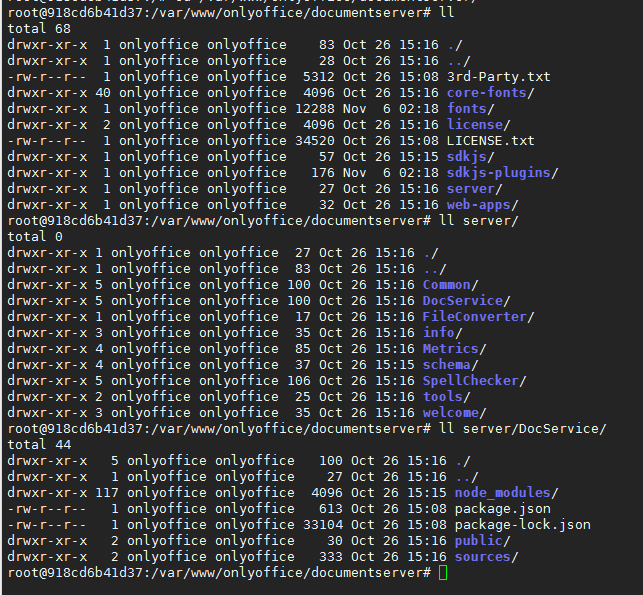
外部pgsql数据库就绪后就执行db初始化的sql,sql文件位置/var/www/onlyoffice/documentserver/server/schema/postgresql/createdb.sql
1 2 3 4 5 6 7 8 9 10 11 12 13 14 15 16 17 18 19 20 21 22 23 24 25 26 27 28 29 30 31 32 33 34 35 36 37 38 39 40 41 42 43 44 45 46 47 48 49 50 51 52 53 54 55 56 57 58 59 60 61 62 63 64 CREATE TABLE IF NOT EXISTS "public"."doc_changes" ("id" varchar (255 ) COLLATE "default" NOT NULL , "change_id" int4 NOT NULL , "user_id" varchar (255 ) COLLATE "default" NOT NULL , "user_id_original" varchar (255 ) COLLATE "default" NOT NULL , "user_name" varchar (255 ) COLLATE "default" NOT NULL , "change_data" text COLLATE "default" NOT NULL , "change_date" timestamp without time zone NOT NULL , PRIMARY KEY ("id", "change_id")) WITH (OIDS= FALSE );CREATE TABLE IF NOT EXISTS "public"."task_result" ("id" varchar (255 ) COLLATE "default" NOT NULL , "status" int2 NOT NULL , "status_info" int4 NOT NULL , "last_open_date" timestamp without time zone NOT NULL , "user_index" int4 NOT NULL DEFAULT 1 , "change_id" int4 NOT NULL DEFAULT 0 , "callback" text COLLATE "default" NOT NULL , "baseurl" text COLLATE "default" NOT NULL , PRIMARY KEY ("id")) WITH (OIDS= FALSE );CREATE OR REPLACE FUNCTION merge_db(_id varchar (255 ), _status int2, _status_info int4, _last_open_date timestamp without time zone, _user_index int4, _change_id int4, _callback text, _baseurl text, OUT isupdate char (5 ), OUT userindex int4) AS $$ DECLARE t_var "public"."task_result"."user_index"% TYPE; BEGIN LOOP UPDATE "public"."task_result" SET last_open_date= _last_open_date, user_index= user_index+ 1 WHERE id = _id RETURNING user_index into userindex; IF found THEN isupdate := 'true' ; RETURN ; END IF; BEGIN INSERT INTO "public"."task_result"(id, status, status_info, last_open_date, user_index, change_id, callback, baseurl) VALUES (_id, _status, _status_info, _last_open_date, _user_index, _change_id, _callback, _baseurl) RETURNING user_index into userindex; isupdate := 'false' ; RETURN ; EXCEPTION WHEN unique_violation THEN END ; END LOOP; END ;$$ LANGUAGE plpgsql;
如果此时使用的是容器内的pgsql则
1
2
chown -R postgres:postgres ${PG_ROOT} chmod -R 700 ${PG_ROOT}
不存在目录PGDATA就
1
2
3
4
5
6
7
8
9
local pg_conf_dir=/etc/postgresql/${PG_VERSION} /${PG_NAME} local postgresql_conf=$pg_conf_dir /postgresql.conflocal hba_conf=$pg_conf_dir /pg_hba.confmv $postgresql_conf $postgresql_conf .backupmv $hba_conf $hba_conf .backuppg_createcluster ${PG_VERSION} ${PG_NAME} PG_NEW_CLUSTER=true
rabbitmq一样,RABBITMQ_SERVER_HOST值不是localhost就使用外部的,是localhost此时就rm -rf /var/run/rabbitmq来保证startup after container kill
redis的host不是localhost就使用
1
2
${JSON} -I -e "this.services.CoAuthoring.redis.host = '${REDIS_SERVER_HOST} '" ${JSON} -I -e "this.services.CoAuthoring.redis.port = '${REDIS_SERVER_PORT} '"
上面对比文件的json对不上,怀疑此处写错了.而且redis没设置密码,解耦的话应该改下onlyoffice的客户端连接参数加上密码
ONLYOFFICE_DATA_CONTAINER_HOST上面都是符合条件就是localhost, 此时进else的话就是执行到行316行函数waiting_for_datacontainer just wait for remote dataread_setting
上面如果是localhost就会在容器里启动pgsql,rabbitmq,redis
然后下面这段代码
1
2
3
4
if [ ${PG_NEW_CLUSTER} = "true" ]; then create_postgresql_db create_postgresql_tbl fi
如果PG是初始化的(也就是前面的一开始不存在目录PGDATA)
1
2
3
4
5
create_postgresql_db sudo -u postgres psql -c "CREATE DATABASE onlyoffice;" sudo -u postgres psql -c "CREATE USER onlyoffice WITH password 'onlyoffice';" sudo -u postgres psql -c "GRANT ALL privileges ON DATABASE onlyoffice TO onlyoffice;" }
create_postgresql_tbl就是上面的sql/var/www/onlyoffice/documentserver/server/schema/postgresql/createdb.sql初始化pgsql
1
2
3
4
5
6
7
8
9
10
11
12
13
if [ ${ONLYOFFICE_DATA_CONTAINER} != "true" ]; then waiting_for_postgresql waiting_for_rabbitmq waiting_for_redis update_nginx_settings update_supervisor_settings service supervisor start service cron start fi
这里的ONLYOFFICE_DATA_CONTAINER值由于没有接触过onlyoffice不知道这个值干啥的
waiting开头的都是等服务端口起来update_nginx_settings看了下是修改nginx的配置文件(/etc/nginx/nginx.conf),否则改为缺省,下面只说缺省修改
worker_processes开头的值修改环境变量,缺省为1worker_connections缺省改为$(ulimit -n)access_log.*改为access_log off;(此处关掉access.log)如果存在文件SSL_CERTIFICATE_PATH(缺省为/var/www/onlyoffice/Data/certs/onlyoffice.crt)和文件SSL_KEY_PATH(缺省为/var/www/onlyoffice/Data/certs/onlyoffice.key)
接上: 就复制文件/etc/onlyoffice/documentserver/nginx/onlyoffice-documentserver-ssl.conf.template到$NGINX_ONLYOFFICE_CONF(缺省为/etc/onlyoffice/documentserver/nginx/onlyoffice-documentserver.conf)
这里后面注意下,因为上一步是复制了文件的,后面可以直接对着template文件看
接上面的ssl,修改文件$NGINX_ONLYOFFICE_CONF里{{SSL_CERTIFICATE_PATH}}为$SSL_CERTIFICATE_PATH
同上修改{{SSL_KEY_PATH}}
开启http2,即替换443 ssl成443 ssl http2
如果$SSL_DHPARAM_PATH(缺省/var/www/onlyoffice/Data/certs/dhparam.pem)可读把行# ssl_dhparam /etc/ssl/certs/dhparam.pem;取消注释,不可读就删除这行
修改包含”ssl_verify_client”行后面的值为${SSL_VERIFY_CLIENT}
${CA_CERTIFICATES_PATH}存在在行”ssl_verify_client”下一行插入ssl_client_certificate ${CA_CERTIFICATES_PATH}如果$ONLYOFFICE_HTTPS_HSTS_ENABLED为true修改max-age=31536000的值改为$ONLYOFFICE_HTTPS_HSTS_MAXAGE,不为true则删除包含max-age的行
以上逻辑都是第四条的存在俩文件,如果不存在俩文件则软连接${NGINX_ONLYOFFICE_PATH}/onlyoffice-documentserver.conf.template到${NGINX_ONLYOFFICE_PATH}/onlyoffice-documentserver.conf,也就是此时不适用ssl
下面不包含在上面的存在文件代码块里
存在文件$NGINX_ONLYOFFICE_EXAMPLE_CONF修改它里面的”linux”改成”docker”
update_supervisor_settings就是把supervisor的配置文件复制到它默认工作目录去然后启动supervisor和cron
下面是349行后面全局执行的逻辑
启动nginx,这里想不通为啥跑个nginx,后面看看能看懂原因不
最后的documentserver-generate-allfonts.sh和documentserver-static-gzip.sh一个是字体一个是压缩备份
整体思路有了,但是发现documentserver似乎好几个组件一起被supervisor跑的
1
2
3
4
5
6
7
8
9
10
root@918cd6b41d37:/etc/supervisor/conf.d total 0 drwxr-xr-x 1 root root 279 Oct 26 15:16 ./ drwxr-xr-x 1 root root 30 Oct 26 08:31 ../ lrwxrwxrwx 1 root root 73 Oct 26 15:09 onlyoffice-documentserver.conf -> ../../onlyoffice/documentserver/supervisor/onlyoffice-documentserver.conf lrwxrwxrwx 1 root root 83 Oct 26 15:09 onlyoffice-documentserver-converter.conf -> ../../onlyoffice/documentserver/supervisor/onlyoffice-documentserver-converter.conf lrwxrwxrwx 1 root root 84 Oct 26 15:09 onlyoffice-documentserver-docservice.conf -> ../../onlyoffice/documentserver/supervisor/onlyoffice-documentserver-docservice.conf lrwxrwxrwx 1 root root 76 Oct 26 15:09 onlyoffice-documentserver-gc.conf -> ../../onlyoffice/documentserver/supervisor/onlyoffice-documentserver-gc.conf lrwxrwxrwx 1 root root 81 Oct 26 15:09 onlyoffice-documentserver-metrics.conf -> ../../onlyoffice/documentserver/supervisor/onlyoffice-documentserver-metrics.conf lrwxrwxrwx 1 root root 86 Oct 26 15:09 onlyoffice-documentserver-spellchecker.conf -> ../../onlyoffice/documentserver/supervisor/onlyoffice-documentserver-spellchecker.conf
所以entrypoint里启动supervisor的时候会启动onlyoffice
镜像里依赖安装太多了,然后找到了非docker安装的文档稍微清晰了些
https://helpcenter.onlyoffice.com/server/linux/document/linux-installation-centos.aspx?_ga=2.211658390.2064741635.1541596271-1982326324.1541482842
https://helpcenter.onlyoffice.com/server/linux/document/index.aspx onlyoffice-documentserver后发现大体文件一样,解包rpm后更直观
1 yum install onlyoffice-documentserver
整体思路有了,documentserver的源码都放一起,里面几个组建都是supervisor跑
由于对于nodejs不熟悉,同学上班也忙,无法帮我拆分项目,项目结构也不熟悉
1
2
3
4
5
6
7
8
9
10
11
12
13
14
15
16
17
18
Software requirements For Debian, Ubuntu and derivatives OS 64-bit Debian, Ubuntu or other compatible distribution with kernel version 3.13 or later Additional Requirements PostgreSQL: version 9.1 or later NGINX: version 1.3.13 or later Node.js: version 8.12.0 or later libstdc++6: version 4.8.4 or later Redis RabbitMQ For RHEL, CentOS and derivatives OS RHEL 7 or CentOS 7 Additional Requirements PostgreSQL: version 9.1 or later NGINX: version 1.3.13 or later Node.js: version 8.12.0 or later Redis RabbitMQ


 目前是打算是把nginx,supervisor(来管理这些组件)放同一个镜像算了,感觉documentserver拆分得太散没必要
看了官方文档的环境要求介绍
目前是打算是把nginx,supervisor(来管理这些组件)放同一个镜像算了,感觉documentserver拆分得太散没必要
看了官方文档的环境要求介绍
