zhangguanzhang's Blog

在非容器环境上实现散装的 IPVS SVC

字数统计: 6.1k阅读时长: 31 min
2021/09/28

前言

内部有非 K8S 环境上需要类似 SVC 的负载实现,一开始是用 NGINX 做的,所有 SVC 域名都解析成一个 dummy IP ,然后 NGINX 根据 server_name 去 proxy 不同的 upstream 。 开始还是能用的,结果后面很多服务依赖 host 这个 header ,报错签名错误,而且毕竟这样是在用户态,效率不如内核态高。于是打算搞下之前的打算:把 IPVS 的 ClusterIP 的 SVC 扣到非 K8S 环境上使用。

kube-proxy 的 SVC 简单讲就是 node 上任何进程访问 SVC IP:SVC PORT 会被 dnat 成 endpoint ,是工作在内核态的四层负载,不会在机器上看到端口监听,而默认非集群的机器是无法访问 SVC IP 。在 K8S 里,endpoint 的 ip 无非就是 POD IPhost IP。前者就是 SVC 选中 POD ,后者例如 kubernetes 这个 SVC ,会 DNAT 成每个 kube-apiserverhost IP:6443 端口,也可能是 ExternalName 或者手动创建的 endpoint 。既然 kubernetes 这个 SVC 可以。那我的打算应该也是可以实现的。但是一开始实际按照思路试了下发现不行,网上的文章基本都是在单机 docker 或者现有的 K8S 环境上搞的,漏掉了很多精华和核心思想,这里记录下我的思路和实现过程。

环境信息

前面说的 SVC 现象是和 kube-proxy 的模式无关的。iptables 模式排查不直观,我更倾向于 IPVS 去搞,它更直观,而且支持更多的调度算法。管理 IPVS 规则的话我们需要安装 ipvsadm ,这里我是两台干净的 CentOS 7.8 来做环境。

IP
192.168.2.111
192.168.2.222

先安装下基础需要的:

1
2
3
4
5
6
7
8
9
10
11
12
13
14
15
16
yum install -y ipvsadm curl wget tcpdump ipset conntrack-tools

# 开启转发

sysctl -w net.ipv4.ip_forward=1

# 确认 iptables 规则清空
$ iptables -S
-P INPUT ACCEPT
-P FORWARD ACCEPT
-P OUTPUT ACCEPT
$ iptables -t nat -S
-P PREROUTING ACCEPT
-P INPUT ACCEPT
-P OUTPUT ACCEPT
-P POSTROUTING ACCEPT

过程

先思考下 kube-proxy 的 IPVS ,因为 SVC 端口和 POD 的端口不一样,所以 kube-proxy 使用的 nat 模式。暂且打算添加一个下面类似的 SVC :

1
2
3
4
5
IP:                169.254.11.2
Port: https 80/TCP
TargetPort: 8080/TCP
Endpoints: 192.168.2.111:8080,192.168.2.222:8080
Session Affinity: None

准备工作

web 的话我是使用的 golang 的一个简单 web 二进制起的 ran :

1
2
3
4
5
6
7
8
9
wget https://github.com/m3ng9i/ran/releases/download/v0.1.6/ran_linux_amd64.zip
unzip -x ran_linux_amd64.zip
mkdir www

# 两个机器创建不同的 index 文件
echo 192.168.2.111 > www/test
echo 192.168.2.222 > www/test

./ran_linux_amd64 -port 8080 -listdir www

两个机器的这个 web 都起来后我们开个窗口去 192.168.2.111 上继续后面的操作。

lvs nat

kube-proxy 并没有像 lvs nat 那样有单独的机器做 NAT GW,或者认为每个 node 都是自己的 NAT GW。现在来添加 169.254.11.2:80 这个 SVC ,使用 ipvsadm 添加:

1
ipvsadm --add-service --tcp-service 169.254.11.2:80 --scheduler rr

先添加本地的 web 作为 real server ,下面含义是添加为一个 nat 类型的 real server :

1
2
ipvsadm --add-server --tcp-service 169.254.11.2:80 \
--real-server 192.168.2.111:8080 --masquerading --weight 1

查看下当前列表:

1
2
3
4
5
6
$ ipvsadm -ln
IP Virtual Server version 1.2.1 (size=4096)
Prot LocalAddress:Port Scheduler Flags
-> RemoteAddress:Port Forward Weight ActiveConn InActConn
TCP 169.254.11.2:80 rr
-> 192.168.2.111:8080 Masq 1 0 0

因为是自己的 NAT GW,所以 VIP 配置在自己身上:

1
ip addr add 169.254.11.2/32 dev eth0

测试下访问看看:

1
2
$ curl 169.254.11.2/www/test
192.168.2.111

添加上另一个节点的 8080:

1
2
3
4
5
6
7
8
9
10
$ ipvsadm --add-server --tcp-service 169.254.11.2:80 \
--real-server 192.168.2.222:8080 --masquerading --weight 1

$ ipvsadm -ln
IP Virtual Server version 1.2.1 (size=4096)
Prot LocalAddress:Port Scheduler Flags
-> RemoteAddress:Port Forward Weight ActiveConn InActConn
TCP 169.254.11.2:80 rr
-> 192.168.2.111:8080 Masq 1 0 0
-> 192.168.2.222:8080 Masq 1 0 0

测试下访问看看:

1
2
$ curl 169.254.11.2/www/test

发现 curl 在卡住和能访问返回 192.168.2.111 之间切换,没有返回 192.168.2.222 的。查看下 IPVS 的 connection ,发现调度到非本机才会卡住:

1
2
3
4
$ ipvsadm -lnc
IPVS connection entries
pro expire state source virtual destination
TCP 00:48 SYN_RECV 169.254.11.2:50698 169.254.11.2:80 192.168.2.222:8080

192.168.2.222 上抓包看看:

1
2
3
4
5
6
7
8
9
10
11
12
13
14
$ tcpdump -nn -i eth0 port 8080
tcpdump: verbose output suppressed, use -v or -vv for full protocol decode
listening on eth0, link-type EN10MB (Ethernet), capture size 262144 bytes
07:38:26.360716 IP 169.254.11.2.50710 > 192.168.2.222.8080: Flags [S], seq 768065283, win 43690, options [mss 65495,sackOK,TS val 12276183 ecr 0,nop,wscale 7], length 0
07:38:26.360762 IP 192.168.2.222.8080 > 169.254.11.2.50710: Flags [S.], seq 2142784980, ack 768065284, win 28960, options [mss 1460,sackOK,TS val 676518144 ecr 12276183,nop,wscale 7], length 0
07:38:27.362848 IP 169.254.11.2.50710 > 192.168.2.222.8080: Flags [S], seq 768065283, win 43690, options [mss 65495,sackOK,TS val 12277186 ecr 0,nop,wscale 7], length 0
07:38:27.362884 IP 192.168.2.222.8080 > 169.254.11.2.50710: Flags [S.], seq 2142784980, ack 768065284, win 28960, options [mss 1460,sackOK,TS val 676519146 ecr 12276183,nop,wscale 7], length 0
07:38:28.562629 IP 192.168.2.222.8080 > 169.254.11.2.50710: Flags [S.], seq 2142784980, ack 768065284, win 28960, options [mss 1460,sackOK,TS val 676520346 ecr 12276183,nop,wscale 7], length 0
07:38:29.368811 IP 169.254.11.2.50710 > 192.168.2.222.8080: Flags [S], seq 768065283, win 43690, options [mss 65495,sackOK,TS val 12279192 ecr 0,nop,wscale 7], length 0
07:38:29.368853 IP 192.168.2.222.8080 > 169.254.11.2.50710: Flags [S.], seq 2142784980, ack 768065284, win 28960, options [mss 1460,sackOK,TS val 676521152 ecr 12276183,nop,wscale 7], length 0
07:38:31.562633 IP 192.168.2.222.8080 > 169.254.11.2.50710: Flags [S.], seq 2142784980, ack 768065284, win 28960, options [mss 1460,sackOK,TS val 676523346 ecr 12276183,nop,wscale 7], length 0
07:38:33.376829 IP 169.254.11.2.50710 > 192.168.2.222.8080: Flags [S], seq 768065283, win 43690, options [mss 65495,sackOK,TS val 12283200 ecr 0,nop,wscale 7], length 0
07:38:33.376869 IP 192.168.2.222.8080 > 169.254.11.2.50710: Flags [S.], seq 2142784980, ack 768065284, win 28960, options [mss 1460,sackOK,TS val 676525160 ecr 12276183,nop,wscale 7], length 0
07:38:37.562632 IP 192.168.2.222.8080 > 169.254.11.2.50710: Flags [S.], seq 2142784980, ack 768065284, win 28960, options [mss 1460,sackOK,TS val 676529346 ecr 12276183,nop,wscale 7], length 0

Flags 看,就是 tcp 重传,并且 SRC IP 是 VIP 。节点 192.168.2.222.8080169.254.11.2.50710 回包会走到网关上去。网关上抓包也看到确实如此:

1
2
3
4
5
6
7
8
9
$ tcpdump -nn -i eth0 host 169.254.11.2
tcpdump: verbose output suppressed, use -v or -vv for full protocol decode
listening on eth0, link-type EN10MB (Ethernet), capture size 262144 bytes
19:39:47.487362 IP 192.168.2.222.8080 > 169.254.11.2.50714: Flags [S.], seq 4149799699, ack 251479303, win 28960, options [mss 1460,sackOK,TS val 676599263 ecr 12357303,nop,wscale 7], length 0
19:39:47.487405 IP 192.168.2.222.8080 > 169.254.11.2.50714: Flags [S.], seq 4149799699, ack 251479303, win 28960, options [mss 1460,sackOK,TS val 676599263 ecr 12357303,nop,wscale 7], length 0
19:39:48.487838 IP 192.168.2.222.8080 > 169.254.11.2.50714: Flags [S.], seq 4149799699, ack 251479303, win 28960, options [mss 1460,sackOK,TS val 676600264 ecr 12357303,nop,wscale 7], length 0
19:39:48.487868 IP 192.168.2.222.8080 > 169.254.11.2.50714: Flags [S.], seq 4149799699, ack 251479303, win 28960, options [mss 1460,sackOK,TS val 676600264 ecr 12357303,nop,wscale 7], length 0
19:39:49.569667 IP 192.168.2.222.8080 > 169.254.11.2.50714: Flags [S.], seq 4149799699, ack 251479303, win 28960, options [mss 1460,sackOK,TS val 676601346 ecr 12357303,nop,wscale 7], length 0
19:39:49.569699 IP 192.168.2.222.8080 > 169.254.11.2.50714: Flags [S.], seq 4149799699, ack 251479303, win 28960, options [mss 1460,sackOK,TS val 676601346 ecr 12357303,nop,wscale 7], length 0

lvs 和 netfilter

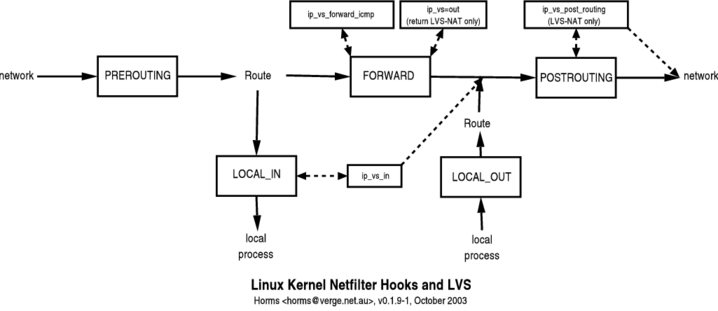
在介绍 lvs 的实现之前,我们需要了解 netfilter ,Linux 的所有数据包都会经过它,而我们使用的 iptables 是用户态提供的操作工具之一。Linux 内核处理进出的数据包分为了 5 个阶段。netfilter 在这 5 个阶段提供了 hook 点,来让注册的 hook 函数来实现对包的过滤和修改。下图的 local process 就是上层的协议栈。

下面是 IPVS 在 netfilter 里的模型图,IPVS 也是基于 netfilter 框架的,但只工作在 INPUT 链上,通过注册 ip_vs_in 钩子函数来处理请求。因为 VIP 我们配置在机器上(常规的 lvs nat 的 VIP 是在 NAT GW 上,我们这里是自己),我们 curl 的时候就会进到 INPUT 链,ip_vs_in 会匹配然后直接跳转触发 POSTROUTING 链,跳过 iptables 规则。

lvs-netfilter

所以请求流程是:

1
2
3
4
5
6
7
8
9
10
11
12
13
14
# CIP: client IP    # RIP: real server IP

CLIENT
| CIP:CPORT -> VIP:VPORT
| ||
| \/
| CIP:CPORT -> VIP:VPORT
LVS DNAT
| CIP:CPORT -> RIP:RPORT
| ||
| \/
| CIP:CPORT -> RIP:RPORT
+
REAL SERVER

lvs 做了 DNAT 并没有做 SNAT ,所以我们利用 iptables 做 SNAT :

1
$ iptables -t nat -A POSTROUTING -m ipvs --vaddr 169.254.11.2 --vport 80 -j MASQUERADE

访问看看还是不通,抓包看还是没生效,nat 是依赖 conntrack 的,而 IPVS 默认不会记录 conntrack,我们需要开启 IPVS 的 conntrack 才可以让 MASQUERADE 生效。

1
2
3
4
5
6
7
8
9
10
11
12
13
14
# 让 Netfilter 的 conntrack 状态管理功能也能应用于 IPVS 模块
$ echo 1 > /proc/sys/net/ipv4/vs/conntrack
$ curl 169.254.11.2/www/test
192.168.2.111
$ curl 169.254.11.2/www/test
192.168.2.222
$ curl 169.254.11.2/www/test
192.168.2.111
$ curl 169.254.11.2/www/test
192.168.2.222
$ curl 169.254.11.2/www/test
192.168.2.111
$ curl 169.254.11.2/www/test
192.168.2.222

现在实现了单个 SVC 的,但是仔细思考下还是有问题,如果后续增加另一个 SVC 又得增加一个 iptables 规则了,那就又回到 iptables 的匹配复杂度耗时长上去了。所以我们可以利用 iptables 的 mark 和 ipset 配合减少 iptables 规则。

利用 ipset 和 iptable 的 mark

iptables_netfilter

iptables 的五链四表如上图所示,我们先删掉原有的规则:

1
$ iptables -t nat -D POSTROUTING -m ipvs --vaddr 169.254.11.2 --vport 80 -j MASQUERADE

平时自己家里使用了 openwrt ,之前看了下上面的 iptables 规则设计挺好的,特别是预留了很多链专门给用户在合适的位置插入规则,比如下面的 INPUT 规则:

1
2
3
4
5
-A INPUT -i eth0 -m comment --comment "!fw3" -j zone_lan_input
...
-A zone_lan_input -m comment --comment "!fw3: Custom lan input rule chain" -j input_lan_rule
-A zone_lan_input -m conntrack --ctstate DNAT -m comment --comment "!fw3: Accept port redirections" -j ACCEPT
-A zone_lan_input -m comment --comment "!fw3" -j zone_lan_src_ACCEPT

zone_lan_src_ACCEPT 是最后面,zone_lan_input 是最开始,那用户向 input_lan_rule 链里插入规则即可,利用多个链来设计也方便别人。
规则设计我们先逆着来思考下,最后肯定是 MASQUERADE 的,得在 nat 表的 POSTROUTING 链创建 MASQUERADE 的规则。

但是添加之前先思考下,lvs 做了 DNAT 后,最后包走向了 POSTROUTING 链,而且后面我们是有多个 SVC 的。此刻包的 SRC IP 会是 VIP,见上面抓包的结果:

1
2
3
4
5
6
7
8
9
10
# 假设没做 masq 的时候(刚好调度到非本地的 real server 上
#也就是上面之前不通在目标机器上抓包)包的阶段

SRC:169.254.11.2:xxxx
DST:169.254.11.2:80
||
|| 没经过 POSTROUTING masq snat 的时候
\/
SRC:169.254.11.2:xxxx
DST:192.168.2.222:80

而且后续可能是在 docker 环境上部署,可能默认桥接网络下的容器也会去访问 SVC,此刻的 SRC IP 就不会是网卡上的 VIP 了,所以我们在 PREROUTING 阶段 dest IP,dest Port 是 svc 信息则做 masq snat。
可以在此刻利用一个 ipset 存储所有的 SVC_IP:SVC_PORT 匹配,然后打上 mark,然后在 POSTROUTING 链去根据 mark 去做 MASQUERADE

1
2
3
4
5
6
7
8
9
10
11
12
13
14
15
16
17
18
19
20
21
22
23
24
25
# PREROUTING 阶段处理

# 提供一个入口链,而不是直接添加在 PREROUTING 链上
iptables -t nat -N ZGZ-SERVICES
iptables -t nat -A PREROUTING -m comment --comment "zgz service portals" -j ZGZ-SERVICES

# 在 PREROUTING 子链里去 ipset 匹配,跳转到我们打 mark 的链
iptables -t nat -N ZGZ-MARK-MASQ
# 创建存储所有 `SVC_IP:SVC_PORT` 的 ipset
ipset create ZGZ-CLUSTER-IP hash:ip,port -exist

# 专门 mark 的链
iptables -t nat -A ZGZ-MARK-MASQ -j MARK --set-xmark 0x2000/0x2000

# 匹配 svc ip:svc port 的才跳转到打 mark 的链里
iptables -t nat -A ZGZ-SERVICES -m comment --comment "zgz service cluster ip + port for masquerade purpose" -m set --match-set ZGZ-CLUSTER-IP dst,dst -j ZGZ-MARK-MASQ


# POSTROUTING 阶段处理

# 提供一个入口链,而不是直接添加在 POSTROUTING 链上
iptables -t nat -N ZGZ-SERVICES-POSTROUTING
iptables -t nat -A POSTROUTING -m comment --comment "zgz postrouting rules" -j ZGZ-SERVICES-POSTROUTING
# 在 POSTROUTING 阶段,有 mark 标记的就做 snat
iptables -t nat -A ZGZ-SERVICES-POSTROUTING -m comment --comment "zgz service traffic requiring SNAT" -m mark --mark 0x2000/0x2000 -j MASQUERADE

然后添加下 SVC_IP:SVC_PORT 到我们的 ipset 里:

1
ipset add ZGZ-CLUSTER-IP 169.254.11.2,tcp:80 -exist

上面我们创建的 ipset 里 ip,port 和 iptables 里 --match-set 后面的 dst,dst 组合在一起就是 DEST IPDEST PORT 同时匹配,下面是一些举例:

ipset type iptables match-set Packet fields
hash:net,port,net src,dst,dst src IP CIDR address, dst port, dst IP CIDR address
hash:net,port,net dst,src,src dst IP CIDR address, src port, src IP CIDR address
hash:ip,port,ip src,dst,dst src IP address, dst port, dst IP address
hash:ip,port,ip dst,src,src dst IP address, src port, src ip address
hash:mac src src mac address
hash:mac dst dst mac address
hash:ip,mac src,src src IP address, src mac address
hash:ip,mac dst,dst dst IP address, dst mac address
hash:ip,mac dst,src dst IP address, src mac address

然后访问下还是不通,通过两台机器轮询负载均衡的 curl html 返回内容看到了访问不通的时候都是调度到非本机,也就是此刻的 curl 只经过 OUTPUT 链,过 POSTROUTING 的时候并没有 mark 也就不会做 masq , 调试了下发现确实会走 OUTPUT 链:

1
2
3
4
5
6
7
8
$ echo 'kern.warning /var/log/iptables.log' >> /etc/rsyslog.conf
$ systemctl restart rsyslog
$ iptables -t nat -I OUTPUT -m set --match-set ZGZ-CLUSTER-IP dst,dst -j LOG --log-prefix '**log-test**'
$ curl 169.254.11.2/www/test
^C
$ cat /var/log/iptables.log
Sep 27 23:17:51 centos7 kernel: **log-test**IN= OUT=lo SRC=169.254.11.2 DST=169.254.11.2 LEN=60 TOS=0x00 PREC=0x00 TTL=64 ID=44864 DF PROTO=TCP SPT=50794 DPT=80 WINDOW=43690 RES=0x00 SYN URGP=0
Sep 27 23:17:52 centos7 kernel: **log-test**IN= OUT=lo SRC=169.254.11.2 DST=169.254.11.2 LEN=60 TOS=0x00 PREC=0x00 TTL=64 ID=2010 DF PROTO=TCP SPT=50796 DPT=80 WINDOW=43690 RES=0x00 SYN URGP=0

需要添加下面规则,让它也进下 svc 判断和打 mark:

1
iptables -t nat -A OUTPUT -m comment --comment "zgz service portals" -j ZGZ-SERVICES

keepalived 的自动化实现

到目前为止都是手动挡,而且没健康检查,其实我们可以利用 keepalived 做个自动挡的。

安装 keepalived 2

CentOS7 自带的源里 keepalived 版本很低,我们安装下比自带新的版本:

1
2
3
4
yum install -y http://www.nosuchhost.net/~cheese/fedora/packages/epel-7/x86_64/cheese-release-7-1.noarch.rpm
yum install -y keepalived
# 备份下自带的配置文件
cp /etc/keepalived/keepalived.conf{,.bak}

配置 keepalived

我们需要配置下 keepalived ,修改之前先看下默认相关的:

1
2
3
4
5
6
7
8
9
10
11
12
13
14
15
16
17
18
19
20
21
22
23
24
25
26
27
28
29
30
$ systemctl cat keepalived
# /usr/lib/systemd/system/keepalived.service
[Unit]
Description=LVS and VRRP High Availability Monitor
After=syslog.target network-online.target

[Service]
Type=forking
KillMode=process
EnvironmentFile=-/etc/sysconfig/keepalived
ExecStart=/usr/sbin/keepalived $KEEPALIVED_OPTIONS
ExecReload=/bin/kill -HUP $MAINPID

[Install]
WantedBy=multi-user.target
$ cat /etc/sysconfig/keepalived
# Options for keepalived. See `keepalived --help' output and keepalived(8) and
# keepalived.conf(5) man pages for a list of all options. Here are the most
# common ones :
#
# --vrrp -P Only run with VRRP subsystem.
# --check -C Only run with Health-checker subsystem.
# --dont-release-vrrp -V Dont remove VRRP VIPs & VROUTEs on daemon stop.
# --dont-release-ipvs -I Dont remove IPVS topology on daemon stop.
# --dump-conf -d Dump the configuration data.
# --log-detail -D Detailed log messages.
# --log-facility -S 0-7 Set local syslog facility (default=LOG_DAEMON)
#

KEEPALIVED_OPTIONS="-D"

/etc/sysconfig/keepalived 里修改为下面:

1
KEEPALIVED_OPTIONS="-D --log-console --log-detail --use-file=/etc/keepalived/keepalived.conf"

我们选择在主配置文件里去 include 子配置文件,keepalivd 接收 kill -HUP 信号触发 reload ,后续自动化添加 SVC 的时候添加子配置文件后发送信号即可。

1
2
3
4
5
6
7
8
9
10
cat > /etc/keepalived/keepalived.conf << EOF
! Configuration File for keepalived

global_defs {

}
# 记住 keepalived 的任何配置文件不能有 x 权限
include /etc/keepalived/conf.d/*.conf
EOF
mkdir -p /etc/keepalived/conf.d/

我们写一个脚本,一个是用来添加一个子配置文件里的相关信息到 ipset 里,另一方面也让它在重启或者启动 keepalived 的时候每次能初始化,先添加 systemd 的部分:

1
2
3
4
5
mkdir -p /usr/lib/systemd/system/keepalived.service.d
cat > /usr/lib/systemd/system/keepalived.service.d/10.keepalived.conf << EOF
[Service]
ExecStartPre=/etc/keepalived/ipvs.sh
EOF

然后编写脚本 /etc/keepalived/ipvs.sh :

1
2
3
4
5
6
7
8
9
10
11
12
13
14
15
16
17
18
19
20
21
22
23
24
25
26
27
28
29
30
31
32
33
34
35
36
37
38
39
40
41
42
43
44
45
46
47
48
49
50
51
52
53
54
55
56
57
58
59
60
61
62
63
64
65
66
67
68
69
70
71
72
73
74
75
76
77
78
79
80
81
82
83
84
85
86
87
88
89
90
91
92
93
#!/bin/bash

set -e

dummy_if=svc
CONF_DIR=/etc/keepalived/conf.d/


function ipset_init(){
ipset create ZGZ-CLUSTER-IP hash:ip,port -exist
ipset flush ZGZ-CLUSTER-IP
local f ip port protocol
for f in $(find ${CONF_DIR} -maxdepth 1 -type f -name '*.conf');do
awk '{if($1=="virtual_server"){printf $2" "$3" ";flag=1;};if(flag==1 && $1=="protocol"){print $2;flag=0}}' "$f" | while read ip port protocol;do
# SVC IP port 插入 ipset 里
ipset add ZGZ-CLUSTER-IP ${ip},${protocol,,}:${port} -exist
# 添加 SVC IP 到 dummy 接口上
if ! ip r g ${ip} | grep -qw lo;then
ip addr add ${ip}/32 dev ${dummy_if}
fi
done
done
}

function create_Chain_in_nat(){
# delete use -X
local Chain option
option="-t nat --wait"

for Chain in $@;do
if ! iptables $option -S | grep -Eq -- "-N\s+${Chain}$";then
iptables $option -N ${Chain}
fi
done
}

function create_Rule_in_nat(){
local cmd='iptables -t nat --wait '
if ! ${cmd} --check "$@" 2>/dev/null;then
${cmd} -A "$@"
fi
}

function iptables_init(){
create_Chain_in_nat ZGZ-SERVICES ZGZ-SERVICES-POSTROUTING ZGZ-SERVICES-MARK-MASQ

create_Rule_in_nat ZGZ-SERVICES-MARK-MASQ -j MARK --set-xmark 0x2000/0x2000

create_Rule_in_nat ZGZ-SERVICES -m comment --comment "zgz service cluster ip + port for masquerade purpose" -m set --match-set ZGZ-CLUSTER-IP dst,dst -j ZGZ-SERVICES-MARK-MASQ

create_Rule_in_nat PREROUTING -m comment --comment "zgz service portals" -j ZGZ-SERVICES
create_Rule_in_nat OUTPUT -m comment --comment "zgz service portals" -j ZGZ-SERVICES

create_Rule_in_nat ZGZ-SERVICES-POSTROUTING -m comment --comment "zgz service traffic requiring SNAT" -m mark --mark 0x2000/0x2000 -j MASQUERADE
create_Rule_in_nat POSTROUTING -m comment --comment "zgz postrouting rules" -j ZGZ-SERVICES-POSTROUTING

}

function ipvs_svc_run(){
ip addr flush dev ${dummy_if}
ipset_init
iptables_init
echo 1 > /proc/sys/net/ipv4/vs/conntrack
}
# 无参数则是 keepalived 启动,也可以接收单个配置文件参数
function main(){
if [ ! -d /proc/sys/net/ipv4/conf/${dummy_if} ];then
ip link add ${dummy_if} type dummy
fi

if [ "$#" -eq 0 ];then
ipvs_svc_run
return
fi

local file fullFile ip port protocol
for file in $@;do
fullFile=${CONF_DIR}/$file
awk '{if($1=="virtual_server"){printf $2" "$3" ";flag=1;};if(flag==1 && $1=="protocol"){print $2;flag=0}}' "$f" | while read ip port protocol;do
# SVC IP port 插入 ipset 里
ipset add ZGZ-CLUSTER-IP ${ip},${protocol,,}:${port} -exist
# 添加 SVC IP 到 dummy 接口上
if ! ip r g ${ip} | grep -qw lo;then
ip addr add ${ip}/32 dev ${dummy_if}
fi
done
done
# 重新 reload
pkill --signal HUP keepalived
}

main $@

脚本就如上面所示,读取 keepalived 的 lvs 文件,把 VIP:PORT 加到 ipset 里,VIP 加到 dummy 接口上,之前是加到 eth0 上,但是业务网卡可能会重启影响,dummy 接口和 loopback 类似,它总是 up 的,除非你 down 掉它,SVC 地址配置在它上面不会随着物理接口状态变化而受到影响。删除掉之前 eth0 上的 VIP ip addr del 169.254.11.2/32 dev eth0,然后把前面的转成 keepalived 的配置文件测试下:

1
2
3
4
5
6
7
8
9
10
11
12
13
14
15
16
17
18
19
20
21
22
23
24
25
26
27
28
29
30
31
32
33
34
35
36
37
38
39
chmod a+x /etc/keepalived/ipvs.sh
cat > /etc/keepalived/conf.d/test.conf << EOF

virtual_server 169.254.11.2 80 {
delay_loop 3
lb_algo rr
lb_kind NAT
protocol TCP
alpha #默认是禁用,会导致在启动daemon时,所有rs都会上来,开启此选项下则是所有的RS在daemon启动的时候是down状态,healthcheck健康检查failed。这有助于其启动时误报错误

real_server 192.168.2.111 8080 {
weight 1
HTTP_GET {
url {
path /404
status_code 404
}
connect_port 8080
connect_timeout 2
retry 2
delay_before_retry 2
}
}

real_server 192.168.2.222 8080 {
weight 1
HTTP_GET {
url {
path /404
status_code 404
}
connect_port 8080
connect_timeout 2
retry 2
delay_before_retry 2
}
}
}
EOF

测试下

1
2
3
4
5
6
7
8
9
10
11
12
13
14
15
16
17
18
19
# 先清理掉之前手动添加的
ipvsadm --clear

systemctl daemon-reload
systemctl restart keepalived

$ curl 169.254.11.2/www/test
192.168.2.222
$ curl 169.254.11.2/www/test
192.168.2.111
$ curl 169.254.11.2/www/test
192.168.2.222
$ curl 169.254.11.2/www/test
192.168.2.111
$ ip a s svc
4: svc: <BROADCAST,NOARP> mtu 1500 qdisc noop state DOWN group default qlen 1000
link/ether e6:a3:29:07:fa:57 brd ff:ff:ff:ff:ff:ff
inet 169.254.11.2/32 scope global svc
valid_lft forever preferred_lft forever

停掉一个 web 后在我们配置的健康检查几秒也剔除了 rs :

1
2
3
4
5
6
7
8
9
10
$ curl 169.254.11.2/www/test
curl: (7) Failed connect to 169.254.11.2:80; Connection refused
$ curl 169.254.11.2/www/test
192.168.2.111
$ curl 169.254.11.2/www/test
192.168.2.111
$ curl 169.254.11.2/www/test
192.168.2.111
$ curl 169.254.11.2/www/test
192.168.2.111

系统的相关配置

后面重启后发现不通,发现内核模块没加载,使用 systemd-modules-load 去开机加载:

1
2
3
4
5
6
7
8
9
10
11
12
13
14
15
16
17
18
cat  > /etc/modules-load.d/ipvs.conf << EOF
ip_vs
ip_vs_rr
ip_vs_wrr
ip_vs_sh

EOF

cat > /etc/sysctl.d/90.ipvs.conf << EOF
# https://github.com/moby/moby/issues/31208
# ipvsadm -l --timout
# 修复ipvs模式下长连接timeout问题 小于900即可
net.ipv4.tcp_keepalive_time=600
net.ipv4.tcp_keepalive_intvl=30
net.ipv4.vs.conntrack=1
# https://github.com/kubernetes/kubernetes/issues/70747 https://github.com/kubernetes/kubernetes/pull/71114
net.ipv4.vs.conn_reuse_mode=0
EOF

docker 运行的方案

docker-compose 文件如下,自己把脚本挂载进去即可:

1
2
3
4
5
6
7
8
9
10
11
12
13
14
15
16
17
18
19
20
21
22
23
24
25
26
27
28
29
30
31
32
33
version: '3.5'
services:
keepalived:
image: 'registry.aliyuncs.com/zhangguanzhang/keepalived:v2.2.0'
hostname: 'keepalived-ipvs'
restart: unless-stopped
container_name: "keepalived-ipvs"
labels:
- app=keepalived
network_mode: host
privileged: true
cap_drop:
- ALL
cap_add:
- NET_BIND_SERVICE
volumes:
- /usr/share/zoneinfo/Asia/Shanghai:/etc/localtime:ro
- /lib/modules:/lib/modules
- /run/xtables.lock:/run/xtables.lock
- ./conf.d/:/etc/keepalived/conf.d/
- ./keepalived.conf:/etc/keepalived/keepalived.conf
- ./always-initsh.d:/always-initsh.d
- ./tools:/etc/tools/
command:
- --dont-fork
- --log-console
- --log-detail
- --use-file=/etc/keepalived/keepalived.conf
logging:
driver: json-file
options:
max-file: '3'
max-size: 20m

容器运行方案注意一个国产化的问题,uos 的 iptables 是 nf_tables 模式,会没锁文件 /run/xtables.lock,需要切成 iptables-legacy

1
2
3
4
5
6
7
8
9
10
$ iptables -V
iptables v1.8.2 (nf_tables)

update-alternatives --set iptables /usr/sbin/iptables-legacy
update-alternatives --set ip6tables /usr/sbin/ip6tables-legacy
update-alternatives --set arptables /usr/sbin/arptables-legacy
update-alternatives --set ebtables /usr/sbin/ebtables-legacy

$ iptables -V
iptables v1.8.2 (legacy)

根据节点 ip 扩容

后续我们有个需求,根据节点 IP 扩容,因为配置都是 ansible 渲染的,而不可能让 ansible 重新渲染所有的文件,也不想造轮子,突然想到用脚本解决得了:

1
2
3
4
5
6
7
8
9
10
11
12
13
14
15
16
17
18
19
20
21
22
23
24
25
26
27
28
29
30
31
32
33
34
35
36
37
38
39
40
41
42
43
44
45
46
47
48
49
50
51
52
53
54
55
56
57
58
59
60
61
62
63
64
65
66
67
68
69
70
71
72
73
74
75
76
77
78
79
80
81
82
83
84
85
86
87
88
89
90
91
92
93
94
95
96
97
98
99
100
101
102
103
104
105
106
107
108
109
110
111
112
113
114
115
116
117
118
#!/bin/bash

: ${node_file:=/etc/tools/node_list.txt}
# 比较 index , 来修改 keepalived 配置文件里的 ip
: ${new_node_file:=/etc/tools/node_list.txt.new}
: ${CONF_DIR:=/etc/keepalived/conf.d}
: ${DT:=date +'%Y-%m-%dT%H:%M:%S%z'}


# logging functions
log() {
local type="$1"; shift
# accept argument string or stdin
local text="$*"; if [ "$#" -eq 0 ]; then text="$(cat)"; fi
local dt; dt="$($DT)"
printf '%s [%s] [scale.sh]: %s\n' "$dt" "$type" "$text"
}
log_note() {
log Note "$@"
}
log_warn() {
log Warn "$@" >&2
}
log_error() {
log ERROR "$@" >&2
exit 1
}

function generated_new(){
local file=$1 print_flag=0 rs_port= end_block=0 start_block=0 block_str=
local new_file=${file}.new h line

# 没有注释 node_scale=true 则跳过,因为所有keepalive 配置文件都在一个目录
# 部分配置文件对应的服务不是在每个节点上,所以 apps 类需要扩容的应用需要在配置文件里注释表明可以扩容
grep -Eqw 'node_scale=true' $file || return 0
rm -f ${new_file};touch ${new_file}
# IFS 保持原样输出
while IFS= read line;do

# 注释和空行输出
if echo "$line" | grep -Eq '^\s*$|^\s*#';then
echo "$line" >> ${new_file}
continue
fi

echo "$line" | grep -Eq '^\s*virtual_server' && {
print_flag=1
block_str=
}

# 跳过剩下的 real_server,因为所有 real server 的内部属性一样
[ $print_flag -eq 5 ] && continue

echo "$line" | grep -Eq '^\s*real_server' && {
print_flag=2
rs_port=$( echo $line | awk '{print $3}' )
continue
}

if [ $print_flag -eq 2 ];then
(( start_block+=$(echo "$line" | sed 's@#.+@@' | grep -Eo '\{' | wc -l) ))
(( end_block+=$(echo "$line" | sed 's@#.+@@' | grep -Eo '\}' | wc -l) ))
[ -z "$block_str" ] && block_str="${line}" || block_str="${block_str}
${line}"

if [ "$end_block" -ne 0 ] && [ "$start_block" -eq "$end_block" ];then

for h in ${node_array[@]};do
printf " real_server %s %s {\n%s\n }\n" $h $rs_port "$block_str" >> ${new_file}
done
echo '}' >> ${new_file}
start_block=0
end_block=0
print_flag=5
fi

fi

if [ $print_flag -eq 1 ];then
echo "$line" >> ${new_file}
fi

done < $file
cat ${new_file} > $file
rm -f ${new_file}
}

function main(){

if [ -z "${CONF_DIR}" ] || [ ! -f "$node_file" ];then
return 0
fi

read -a node_array < "$node_file"

if [ -f "$new_node_file" ];then
read -a new_node_array < "$new_node_file"
if [ "${#node_array[@]}" -ne ${#new_node_array[@]} ];then
log_error "新老 node_list 文件里 IP 数量不匹配,无法执行更改 IP 操作"
fi
for((i=0;i<${#node_array[@]};i++))
do
#echo sed -ri "s#${node_array[$i]}#${new_node_array[$i]}#" ${CONF_DIR}/*.conf
# 替换成新的 IP
sed -ri "s#${node_array[$i]}#${new_node_array[$i]}#" ${CONF_DIR}/*.conf
done
cat "$new_node_file" > "$node_file"
rm -f "$new_node_file"
else
export -f generated_new
if [ "${#node_array[@]}" -le 2 ];then
# 透传 node_array
find ${CONF_DIR} -type f -name '*.conf' | xargs -n1 -I {} -P 0 bash -c "`declare -p node_array`; generated_new {}"
fi
fi
}

main

上面脚本存在容器里的 /etc/tools/sacle.sh ,然后所有的节点 IP 存在 tools/node_list.txt ,让 sacle.sh 读取进来形成 array ,然后对每个配置文件执行上面脚本。

参考文档

CATALOG
  1. 1. 前言
  2. 2. 环境信息
  3. 3. 过程
    1. 3.1. 准备工作
    2. 3.2. lvs nat
      1. 3.2.1. lvs 和 netfilter
    3. 3.3. 利用 ipset 和 iptable 的 mark
    4. 3.4. keepalived 的自动化实现
      1. 3.4.1. 安装 keepalived 2
      2. 3.4.2. 配置 keepalived
      3. 3.4.3. 系统的相关配置
    5. 3.5. docker 运行的方案
    6. 3.6. 根据节点 ip 扩容
  4. 4. 参考文档