EmuELEC 笔记 后续关于 EmuELEC 的笔记和知识点都会在这里更新,假定看到这篇文章的人都具备一些 Linux 基础,命令,path,分区,挂载之类的知识。
EmuELEC 介绍 EmuELEC 是专为 Amlogic(晶晨)S905/S912 方案的盒子开发的游戏系统,它基于 CoreELEC 系统,在 CoreELEC 的基础上移植了 RetroArch 和众多的独立模拟器。EmuELEC 前身为 Sx05RE。Sx05RE 整合了 Lakka、KODI、EmulationStation,常被人简称为三合一。它实际上也是一个 Linux 系统,最新版本开始只支持 arm64 架构了。
通常我们使用便宜的电视盒子(基本9成都是晶晨的 cpu)来刷 EmuELEC 系统,然后配合手柄(xbox协议,ps、psp和30块钱左右的无线手柄)能玩很多平台的游戏:
1
2
3
4
5
3do atari2600 atarilynx coleco downloads gameandwatch gbah genh megadrive n64 nes openbor pcfx pspminis screenshots sg-1000 solarus uzebox wonderswan amiga atari5200 atarist c128 cps1 dreamcast gamegear gbc gw megadrive-japan naomi nesh pc pico-8 psx scummvm sgfx splash vectrex wonderswancolor amigacd32 atari7800 atomiswave c16 cps2 famicom gamegearh gbch intellivision mplayer nds ngp pc98 pokemini saturn sega32x snes tg16 vic20 x68000 amstradcpc atari800 bezels c64 cps3 fbneo gb gbh mame msx neocd ngpc pcengine ports savestates segacd snesh tg16cd videopac zx81 arcade atarijaguar BGM capcom daphne fds gba genesis mastersystem msx2 neogeo odyssey pcenginecd psp sc-3000 sfc snesmsu1 tic-80 virtualboy zxspectrum
arcade、mame、neogeo capcom(这四个是街机)、nes、nds、gba、ps、psp、fc、sfc、很多平台的游戏。我个人是使用 N1 盒子,但是不推荐,很多那种宽带送的电视盒子也行,根据现在的讯息去看哪个合适。国内的话能讨论这方面的有以下几个平台:
刷机 一般是两种:
电视盒子解密(并不是所有盒子都能折腾这个)后,在盒子上安装 Reboot to LibreELEC 的 apk ,运行它从安卓电视系统切换到 U 盘启动,从而进入到游戏系统。
你盒子本身支持从 U 盘启动,你 U 盘写入 EmuELEC 的 img 文件后插到盒子上开机即可。
刷机软件推荐 balenaEtcher ,建议下载 Portable 免安装的版本。EmuELEC 的镜像去搜你设备关键字+EmuELC 找。
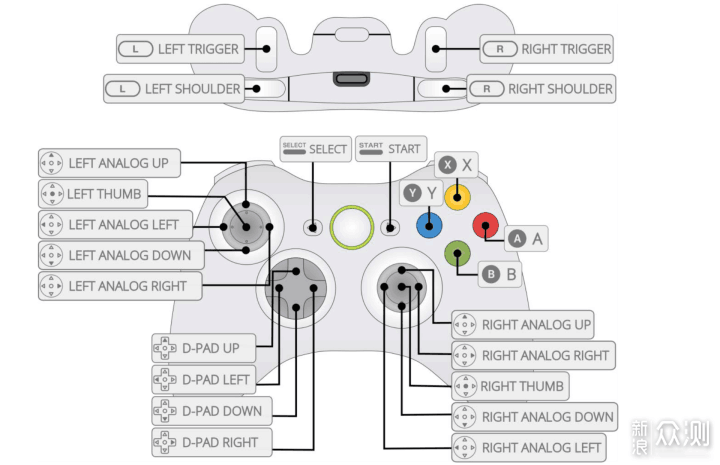
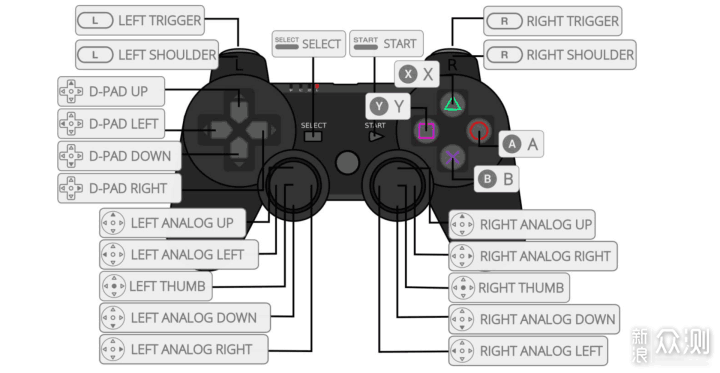
初次打开需要设置手柄,手柄映射图
分区讲解 EmuELEC 的 img 刷到内存卡或者 U盘里后,windows 会弹出的让你是否格式化,记得点击否,一般是两个分区:
EMUELEC 的 FAT32 分区 ,内存放有 dtb(device tree)的分区,不同电视盒子的 dtb 文件不一样,一般初次需要我们进里面的目录 device_trees 里把你设备的 xxx-dtb.img 拷贝到根目录的 dtb.img
ext4 的分区, windows 无法识别,单独存放游戏 roms 的分区。也是一些对外开放的配置引入。单独会被挂载成 /storage 目录
EEROMS , 4.0 后开始新增的的分区,也就是之前的 /storage/roms 单独抽出来的一个单独分区,游戏都会存放在这里。
前者是系统分区,一般升级的话升级这个就行了。添加游戏啥的可以在后者分区里按照平台添加,后者分区可以在 windows 上使用 DiskGenius 打开。不过你刷好开机以及联网后,其实会自带一个 ssh 和 samba。都可以连上去操作,ssh 登录信息是 root/emuelec。 开机挂载 /storage/roms 的逻辑可以看脚本 cat /usr/bin/mount_romfs.sh
目录结构 1 2 3 4 5 6 7 8 9 10 11 12 13 14 15 16 17 EmuELEC:~ # df -h Filesystem Size Used Available Use% Mounted on devtmpfs 791.1M 4.0K 791.1M 0% /dev /dev/sda1 1.0G 694.4M 330.6M 68% /flash /dev/loop0 673.5M 673.5M 0 100% / /dev/sda2 26.1G 21.8G 4.3G 84% /storage tmpfs 902.1M 0 902.1M 0% /dev/shm tmpfs 902.1M 9.2M 892.8M 1% /run tmpfs 902.1M 0 902.1M 0% /sys/fs/cgroup tmpfs 902.1M 2.6M 899.5M 0% /var tmpfs 902.1M 0 902.1M 0% /tmp none 26.1G 21.8G 4.3G 84% /tmp/database none 26.1G 21.8G 4.3G 84% /tmp/cores none 26.1G 21.8G 4.3G 84% /tmp/joypads none 26.1G 21.8G 4.3G 84% /tmp/shaders none 26.1G 21.8G 4.3G 84% /tmp/overlays none 26.1G 21.8G 4.3G 84% /tmp/assets
启动后, EMUELEC 分区被挂载为 /flash, STORAGE 分区被挂载为 /storage, system.img(也可能是那个 SYSTEM) 通过 /dev/loop0 被挂载为系统根目录 / 。所以, 用户能修改的仅仅是 /flash 和 /storage 目录下的内容/storage, 如果需要添加登录后自动执行的命令(例如添加alias), 可以直接在 /storage 目录下新建 .profile 文件来实现。
wifi 文件 /storage/.config/emuelec/configs/emuelec.conf
1 2 3 4 5 6 7 8 9 10 ## Activate wifi (0,1) wifi.enabled=1 wifi.ssid=CMCC-5G wifi.key=zhangguanzhang # secondary wifi (not configurable via the user interface) #wifi2.ssid=new ssid #wifi2.key=new key # third wifi (not configurable via the user interface) #wifi3.ssid=new ssid #wifi3.key=new key
RA 配置文件 /storage/.config/retroarch/retroarch.cfg
编译 下载源码进入 make image,专门平台就加变量编译,例如:
1 PROJECT=Amlogic-ce DEVICE=Amlogic-ng ARCH=aarch64 DISTRO=EmuELEC make image
例如贴吧也有人发自己编译的版本,但是这些比一般会锁 ssh,不让别人修改,当然你懂 Linux 的话可以 img 文件挂载了去改。网上也基本搜不到啥关于长篇大论讲编译的教程。建议还是先看官方的 README.md
使用问题 个别 HDMI 屏幕没声音 没声音的话尝试 EmuELEC setting – 音频 0,0 0,1 后重启试试。
延迟 有些人说是手柄问题,有线好于 > 无线,某些牌子无线 > 另外的无线。也有人说电视的原因。
进阶玩法 https://github.com/EmuELEC/EmuELEC/wiki/bios bios存放路径
roms 网站
缩容和提取 roms 需要缩容是因为 img 里所有分区表大小加起来会超过 U 盘容量。
windows 缩容和提取 roms 把 img 文件拖到 DiskGenius 里,然后删掉几个大游戏,特别 psp 里的。删掉后分区表大小并没变小,然后利用分区克隆工具,按照非 EEROMS 的分区在你 U 盘上创建后前面的分区,然后剩下分区给 EEROMS。格式化的时候记得每个分区的卷标名要设置上,EMUELEC、STORAGE 和 EEROMS。提取的话直接复制出来即可。
Linux 缩容和提取 roms 帮同事弄的时候他 U 盘小于 64G ,DiskGenius 里分区克隆说不能克隆,气得我在 Linux 上搞。注意容量,先把 64G 的这个 img 文件拷贝到 Linux 上。
1 2 3 4 5 6 7 8 9 10 11 12 13 14 $ ls -l emuelec4.3正式版-s905x3-58g-3.img -rw-r--r-- 1 root root 62302191616 Jan 24 19:17 emuelec4.3正式版-s905x3-58g-3.img $ parted emuelec4.3正式版-s905x3-58g-3.img u s p Model: (file) Disk /data/emuelec4.3正式版-s905x3-58g-3.img: 121683968s Sector size (logical/physical): 512B/512B Partition Table: msdos Disk Flags: Number Start End Size Type File system Flags 1 8192s 4202495s 4194304s primary fat32 boot, lba 2 4202496s 8388608s 4186113s primary ext4 3 8390656s 121683967s 113293312s primary fat32 lba
img 挂载到本地目录 1 2 3 4 5 6 7 8 9 10 LOOP_D=$(losetup --find) losetup --partscan $LOOP_D emuelec4.3正式版-s905x3-58g-3.img mkdir -p p1 p2 p3mount -o iocharset=utf8 ${LOOP_D} p1 p1 mount ${LOOP_D} p2 p2 mount -o iocharset=utf8 ${LOOP_D} p3 p3
克隆文件系统到 U 盘上 创建 U 盘分区表,start 和 end 按照 img 文件里的信息来,最后分区结尾是 100%
1 2 3 4 5 6 7 8 $ lsblk sdc 8:32 1 57.6G 0 disk parted /dev/sdc mkpart p fat32 8192s 4202495s parted /dev/sdc set 1 boot on parted /dev/sdc mkpart p ext4 4202496s 8388608s parted /dev/sdc mkpart p fat32 8390656s 100%
查看下 u 盘分区信息和 img 信息是符合
1 2 3 4 5 6 7 8 9 10 11 $ parted /dev/sdc u s p Model: Kingston DataTraveler 3.0 (scsi) Disk /dev/sdc: 120845300s Sector size (logical/physical): 512B/512B Partition Table: msdos Disk Flags: Number Start End Size Type File system Flags 1 8192s 4202495s 4194304s primary boot, lba 2 4202496s 8388608s 4186113s primary 3 8390656s 120844287s 112453632s primary lba
格式化出 U 盘文件系统:
1 2 3 4 5 mkfs.vfat -F 32 -n EMUELEC /dev/sdc1 mkfs.ext4 -L STORAGE /dev/sdc2 mkfs.vfat -F 32 -n EEROMS /dev/sdc3
如果忘记 LABEL,后面打也行
1 2 3 4 5 fatlabel /dev/sdc1 EMUELEC tune2fs -L STORAGE /dev/sdc2 fatlabel /dev/sdc3 EEROMS # 查看 LABEL lsblk -o PATH,LABEL
U 盘文件挂载到本地,并开始复制:
1 2 3 4 5 6 7 8 9 10 11 12 13 14 15 mkdir -p u{1..3} mount -o iocharset=utf8 /dev/sdc1 u1 mount /dev/sdc2 u2 mount -o iocharset=utf8 /dev/sdc3 u3 # 拷贝之前 df -h 看下 p3 的已使用大小是否小于等于 u3 分区表大小 # 如果不是 可以删掉 EEROMS 分区下面 psp 里的大游戏先 rsync -vzrtopgl p1/ u1/ rsync -vzrtopgl p2/ u2/ rsync -vzrtopgl p3/ u3/ 取消 U 盘挂载 ```bash umount u{1..3}
制作真正缩容的 img 前面的 img 挂载不要取消,我们来制作一个缩小容量的 img 文件来分享给别人使用。
1 2 3 4 5 6 7 8 # 制作一个 57G 的空文件 truncate -s 57G test.img # 对文件开始分区,分区信息参考下 img parted test.img mklabel msdos parted test.img mkpart p fat32 8192s 4202495s parted test.img set 1 boot on parted test.img mkpart p ext4 4202496s 8388608s parted test.img mkpart p fat32 8390656s 100%
挂载我们的 img 文件:
1 2 3 4 5 6 7 8 9 10 11 LOOP_D2=$(losetup --find) losetup --partscan $LOOP_D2 test.img # 创建分区表 mkfs.vfat -F 32 -n EMUELEC ${LOOP_D2}p1 mkfs.ext4 -L STORAGE ${LOOP_D2}p2 mkfs.vfat -F 32 -n EEROMS ${LOOP_D2}p3 # 挂载 mkdir -p u{1..3} mount -o iocharset=utf8 ${LOOP_D2}p1 u1 mount ${LOOP_D2}p2 u2 mount -o iocharset=utf8 ${LOOP_D2}p3 u3
拷贝到我们的新 img 里:
1 2 3 4 rsync -vzrtopgl p1/ u1/ rsync -vzrtopgl p2/ u2/ rsync -vzrtopgl p3/ u3/ umount u{1..3}
取消两个 img 文件映射:
1 2 3 umount p{1..3} losetup -D ${LOOP_D2} losetup -D ${LOOP_D}
然后新的 img 文件就可以直接刷 U 盘了。
外置 roms 也就是你可能一个 2G 或者 4G 的 U 盘刷纯净系统,然后游戏 roms 都存放在其他地方:
其他存储介质,例如另一个 u 盘或者移动硬盘。不懂 Linux 的话可以格式化成 fat32,这样 windows 可以识别,分区里新建一个 roms 文件夹,然后 roms 里存放一个空白文件 emuelecroms ,roms 目录里存放各个目录即可。移动硬盘一般是 exfat 分区,linux 和 windows 都能识别。 samba 的话官方推荐使用 systemd mount 挂载,见 sabma share
网络存储,nas上分享成 samba,或者你自己电脑上开共享。
阿里云盘 webdav 挂载,我自己研究出来的
默认行为可以看脚本 cat /usr/bin/mount_romfs.sh
exfat 移动硬盘 移动硬盘格式化成 exfat 格式,然后游戏 roms 拷贝进去,插上去后会自动挂载一个分区:
1 2 3 4 5 6 7 8 9 10 11 12 13 14 15 16 17 18 19 20 21 22 EmuELEC:~ # df -h Filesystem Size Used Available Use% Mounted on devtmpfs 791.1M 4.0K 791.1M 0% /dev /dev/sda1 1.0G 694.4M 330.6M 68% /flash /dev/loop0 673.5M 673.5M 0 100% / /dev/sda2 26.1G 21.9G 4.2G 84% /storage tmpfs 902.1M 0 902.1M 0% /dev/shm tmpfs 902.1M 10.3M 891.8M 1% /run tmpfs 902.1M 0 902.1M 0% /sys/fs/cgroup tmpfs 902.1M 2.6M 899.5M 0% /var tmpfs 902.1M 0 902.1M 0% /tmp none 26.1G 21.9G 4.2G 84% /tmp/overlays none 26.1G 21.9G 4.2G 84% /tmp/joypads none 26.1G 21.9G 4.2G 84% /tmp/assets none 26.1G 21.9G 4.2G 84% /tmp/cores none 26.1G 21.9G 4.2G 84% /tmp/database none 26.1G 21.9G 4.2G 84% /tmp/shaders /dev/sdb1 119.2G 43.1G 76.2G 36% /var/media/ZGZ # 这里我的卷名字是 ZGZ # umount 掉 /var/media/ZGZ 后挂载到 /storage/roms EmuELEC:~ # umount /var/media/ZGZ/ EmuELEC:~ # mount -t exfat -o nonempty /dev/sdb1 /storage/roms
webdav 阿里云盘 webdav 是我自己摸索出来的,因为有 aliyundrive-webdav 项目能把阿里云盘抽象成 webdav ,但是我 ssh 上去看了下我的固件里并不行:
1 2 EmuELEC:~ # mount mount mount.exfat mount.exfat-fuse mount.fuse mount.ntfs mountpoint
在官方 github 上 提了 issue 后,开发者告诉我 installentware 后能使用 opkg,我就整出来了。
aliyundrive-webdav 先准备用大佬的 messense/aliyundrive-webdav 把 阿里云盘 抽象成局域网的 webdav。有两种方案,一种是 openwrt 上,一种是非 openwrt 上,非 openwrt 上我是 Linux 跑 docker,windows 自己去 release 上下载 windows 的。Linux 的话 docker-compose 如下:
1 2 3 4 5 6 7 8 9 10 11 12 13 14 15 16 17 18 version: '3.3' services: aliyundrive-webdav: container_name: aliyundrive-webdav restart: unless-stopped network_mode: host environment: - 'REFRESH_TOKEN=xxxxxx' - HOST=0.0.0.0 - PORT=8080 - WEBDAV_AUTH_USER=root - WEBDAV_AUTH_PASSWORD=root image: messense/aliyundrive-webdav command: - /usr/bin/aliyundrive-webdav - --auto-index - --root=/person/life/Game/EmuELEC/roms - --cache-ttl=10
挂载 webdav 实际上我研究出两种方案,一种是利用 rclone,一种是安装 davfs2 挂载
rclone 先ssh 上去 wget 下载 linux-arm64.zip 后,unzip -x 解压它后挂载:
1 2 3 4 echo "root" | ./rclone obscure -./rclone mount :webdav: roms --webdav-url http://192.168.101.1:8080 --webdav-user root --webdav-pass DRggunKeWmBO8A9b9T2ZmkPFaR8 --cache-dir /tmp --allow-other --vfs-cache-mode writes --allow-non-empty
rclone webdav 文档:
mount -t davfs 先 ssh 上去
然后你就能使用 opkg 了,安装下 davfs2,源在国外,不能安装就去上面的 issue 里 看我安装时候的 url
当然这样是无法在 EmuELEC 里使用的,就像我提的 issue 里,需要修改几个地方:
1 2 vi /opt/etc/davfs2/davfs2.conf
改完后用 grep -Ev '^\s*$|^\s*#' /opt/etc/davfs2/davfs2.conf 查看是这样的内容
1 2 dav_user root # system wide config file only dav_group root # system wide config file only
然后更改 secret 的文件权限,否则挂载 webdav 的时候会报错 mount.davfs: file /opt/etc/davfs2/secrets has wrong permissions
1 chmod 0600 /opt/etc/davfs2/secrets
挂载 webdav,挂载完后建议 ls /storage/roms下,初次有一点卡
1 mount -t davfs http://192.168.101.1:8080 /storage/roms
后续挂载前记得执行
1 rm -f /opt/var/run/mount.davfs/storage-roms.pid
挂载完后进菜单刷新下游戏。
关于 webdav 的一些文档:
后续可以参考 samba 写一个 systemd 的 mount
自制 roms 我这里是自己打包一个纯净的 N1 img 和网上其他 img 里的 ROMS 复制进去为主。
N1 是个特殊存在,参照下面两个帖子:
下载官方的 img 文件,然后 N1 的补丁文件我用在 4.3 的官方文件里去替换是可以的。对比了下我之前的人中日月的固件和官方 img 替换了 N1 补丁文件后,发现内核是一样的都是 3.14.29,说明人中日月打包也只是基础设置+游戏 roms 而已。
emuelec 菜单时区,也可以可以 ssh 上去
ra 的中文乱码,systemctl cat tmp-assets.mount , cp -a /tmp/assets/* /storage/assets/ 后提取中文字体覆盖 /storage/assets/ozone/ 下的俩 ttf 后(似乎下面的 pkg 目录也要处理?)。重启机器后选择中文,然后再在 RA 里选择保存下配置。
自家 wifi 设置啥的
然后拔下来,插 Linux 上。
1 2 3 4 5 6 7 8 9 10 11 12 $ parted /dev/sda u s p Model: SanDisk Extreme Pro (scsi) Disk /dev/sda: 250085376s Sector size (logical/physical): 512B/512B Partition Table: msdos Disk Flags: Number Start End Size Type File system Flags 1 8192s 4202495s 4194304s primary fat32 boot, lba 2 4202496s 8388608s 4186113s primary ext4 3 8390656s 250085375s 241694720s primary fat32 lba
有三个分区,先打包一个纯净版,考虑到 U 盘容量问题和现在购买基本都是 16G(jd 上好像最小 8G),打包一个 7350M 的纯净版。
1 truncate -s 7350M test.img
先把设置后的 U 盘内文件系统的东西导出来到 test.img 里:
1 2 3 4 5 6 7 8 9 10 11 12 13 14 15 16 17 18 19 20 21 22 23 24 25 26 27 28 29 30 31 32 33 34 35 36 37 mkdir e1 e2 e3mount -o iocharset=utf8 /dev/sda1 e1 mount /dev/sda2 e2 mount -o iocharset=utf8 /dev/sda1 e3 parted test.img mklabel msdos parted test.img mkpart p fat32 8192s 4202495s parted test.img set 1 boot on parted test.img mkpart p ext4 4202496s 8388608s parted test.img mkpart p fat32 8390656s 100% LOOP_D=$(losetup --find) losetup --partscan $LOOP_D test.img mkfs.vfat -F 32 -n EMUELEC ${LOOP_D} p1 mkfs.ext4 -L STORAGE ${LOOP_D} p2 mkfs.vfat -F 32 -n EEROMS ${LOOP_D} p3 mkdir -p u{1..3}mount -o iocharset=utf8 ${LOOP_D} p1 u1 mount ${LOOP_D} p2 u2 mount -o iocharset=utf8 ${LOOP_D} p3 u3 rsync -vzrtopgl e1/ u1/ rsync -vzrtopgl e2/ u2/ rsync -vzrtopgl e3/ u3/ echo "alias ll='ls -l'" >> u2/.config/profile.d/99-emuelec_functions.conf
拷贝完成后,可以进行一些修改,例如后面的菜单汉化和主题修改。改完了后就可以收尾工作:
1 2 3 4 5 umount e{1..2} u{1..3} losetup -D $LOOP_D mv test.img EmuELEC-4.3-N1-3.img gzip EmuELEC-4.3-N1-3.img
一些其他笔记 ssh 的一些设置 /storage/.config/emuelec/configs/emuelec.conf 里修改时区 system.timezone=Asia/Shanghai
蓝牙相关 连蓝牙手柄参考:
1 2 3 4 5 6 7 8 bluetoothctl default-agent power on discoverable on pairable on scan on
然后会开始扫描 蓝牙,记录下你的蓝牙手柄 MAC,开始配对
1 2 3 trust AC:FD:93:CB:3E:BE pair AC:FD:93:CB:3E:BE connect AC:FD:93:CB:3E:BE
移除设备的话
1 remove AC:FD:93:CB:3E:BE
主题 去官方仓库找,例如 EmuELEC/es-theme-alekfull-EmueELEC ,进入下面目录下载后解压:
1 2 3 4 cd /storage/.config/emulationstation/themes wget https://github.com/EmuELEC/es-theme-alekfull-EmueELEC/archive/refs/heads/master.zip unzip -x master.zip && rm -f master.zip mv es-theme-alekfull-EmueELEC-* es-theme-alekfull-EmueELEC
主题设置在 /storage/.config/emulationstation/es_settings.cfg 里的 ThemeSet
菜单汉化的话 善用 find ,例如我看了下菜单里有部分还是英文,例如 DANGER ZONE,用命令查 find / -type f -exec grep -Eil 'DANGER\s+zone' {} \;,找到如下文件:
1 2 3 4 5 6 7 8 9 10 11 12 13 14 15 16 17 18 19 20 21 22 23 24 25 26 27 28 29 30 /storage/.config/emulationstation/resources/mamenames.xml /storage/.config/emuelec/configs/locale/de/LC_MESSAGES/emulationstation2.po /storage/.config/emuelec/configs/locale/pt_PT/LC_MESSAGES/emulationstation2.po /storage/.config/emuelec/configs/locale/ko/LC_MESSAGES/emulationstation2.po /storage/.config/emuelec/configs/locale/hu/LC_MESSAGES/emulationstation2.po /storage/.config/emuelec/configs/locale/nb_NO/LC_MESSAGES/emulationstation2.po /storage/.config/emuelec/configs/locale/pl/LC_MESSAGES/emulationstation2.po /storage/.config/emuelec/configs/locale/ca/LC_MESSAGES/emulationstation2.po /storage/.config/emuelec/configs/locale/zh_TW/LC_MESSAGES/emulationstation2.po /storage/.config/emuelec/configs/locale/pt_BR/LC_MESSAGES/emulationstation2.po /storage/.config/emuelec/configs/locale/it/LC_MESSAGES/emulationstation2.po /storage/.config/emuelec/configs/locale/he/LC_MESSAGES/emulationstation2.po /storage/.config/emuelec/configs/locale/uk_UA/LC_MESSAGES/emulationstation2.po /storage/.config/emuelec/configs/locale/ru_RU/LC_MESSAGES/emulationstation2.po /storage/.config/emuelec/configs/locale/sv_SE/LC_MESSAGES/emulationstation2.po /storage/.config/emuelec/configs/locale/oc_FR/LC_MESSAGES/emulationstation2.po /storage/.config/emuelec/configs/locale/eu_ES/LC_MESSAGES/emulationstation2.po /storage/.config/emuelec/configs/locale/nl/LC_MESSAGES/emulationstation2.po /storage/.config/emuelec/configs/locale/el/LC_MESSAGES/emulationstation2.po /storage/.config/emuelec/configs/locale/zh_CN/LC_MESSAGES/emulationstation2.po /storage/.config/emuelec/configs/locale/zh_CN/LC_MESSAGES/emulationstation2.po~ /storage/.config/emuelec/configs/locale/cy_GB/LC_MESSAGES/emulationstation2.po /storage/.config/emuelec/configs/locale/ja_JP/LC_MESSAGES/emulationstation2.po /storage/.config/emuelec/configs/locale/nn_NO/LC_MESSAGES/emulationstation2.po /storage/.config/emuelec/configs/locale/es_MX/LC_MESSAGES/emulationstation2.po /storage/.config/emuelec/configs/locale/tr/LC_MESSAGES/emulationstation2.po /storage/.config/emuelec/configs/locale/es/LC_MESSAGES/emulationstation2.po /storage/.config/emuelec/configs/locale/es/LC_MESSAGES/emulationstation2.po~ /storage/.config/emuelec/configs/locale/fr/LC_MESSAGES/emulationstation2.po /storage/.config/emuelec/configs/locale/ar/LC_MESSAGES/emulationstation2.po
例如我要汉化 DANGER ZONE 这个菜单,按照下面步骤修改文件内容后发布:
1 2 3 4 cd /storage/.config/emuelec/configs/locale/zh_CN/LC_MESSAGES/ vi emulationstation2.po # msgfmt 在包 gettext 里 msgfmt -o emulationstation2.mo emulationstation2.po
N1 补丁后开机 CoreELEC 图标解决 参照 N1 启动原版 EmuELEC :
目前 N1跑 Emuelec 的办法都是替换补丁,补丁里的内核是从 CoreELEC 编译来的,所以启动时会显示 CoreELEC 的 logo,对于洁癖党来说不能忍受,而且一直用这个补丁内核的话,就不能随 EmuELEC 的更新而更新。哪有没有办法直接启动原版呢?答案是肯定的。首先得搞清楚为什么N1不能启动原版的原因。那是因为 EmuELEC 的内核打包成 Android boot image 格式,而 N1 的 uboot 却只支持未经压缩的内核,那我们只要想办法从 EmuELEC 的中解包出来未经压缩的内核和 initramfs 就可以了。这个页面点那个 download 下载 unmkbootimg ,解压,在 linux 环境运行。
1 2 3 4 5 6 7 8 9 10 11 12 wget http://whiteboard.ping.se/uploads/Android/unmkbootimg.gz gzip -d unmkbootimg.gz chmod a+x unmkbootimg./unmkbootimg kernel.img initramfs.cpio.gz zImage To recompile this image, use: mkbootimg --kernel zImage --ramdisk initramfs.cpio.gz ...
如果此时需要修改开机图片的话,可以执行下面操作,这个步骤是通用的
1 2 3 4 5 6 7 8 9 10 11 12 13 14 mkdir initramfscd initramfscpio -idmv < ../initramfs.cpio.gz ls -l splash/find . -print0 | cpio --null --create --format=newc > ../initramfs.cpio.gz cd ..mkbootimg --kernel zImage --ramdisk initramfs.cpio.gz --base 0x0 --kernel_offset 0x1080000 -o new_kernel.img
下面的没试过,主要是 N1 的步骤
1 2 3 4 5 6 # https://www.right.com.cn/forum/thread-6632323-1-1.html # 把 initramfs.cpio.gz 打包成 uInitrd。 mkimage -A arm64 -O linux -T kernel -C none -d initramfs.cpio.gz uInitrd #这里得到的 kernel 就是未压缩的内核,把他改名成 kernel.img。 lzop -d zImage -o kernel.img.new
大功告成,把 kernel.img 和 uInitrd 替换补丁里的同名文件,启动时就是用原版内核了
开机启动顺序 https://blog.csdn.net/michaelchain/article/details/119628601 参考这个,更多的不写进来了
这个是在 uboot 中进行管理的, 可以通过 fw_printenv 命令进行查看:
1 2 3 4 5 6 7 8 9 10 11 12 13 EmuELEC:~ # fw_printenv ... baudrate=115200 boot_count=0 bootcmd=if test ${bootfromnand} = 1; then setenv bootfromnand 0; saveenv; else run bootfromsd; run bootfromusb; fi; run storeboot bootcount_check=echo bootcounts=${boot_count}; if itest ${boot_count} == 0; then setenv boot_count 1;saveenv;else if itest ${boot_count} == 1; then setenv boot_count 2;saveenv;else if itest ${boot_count} == 2; then setenv boot_count 3;saveenv;else if itest ${boot_count} == 3; then setenv boot_count 4;saveenv;else if itest ${boot_count} == 4; then run recovery_from_flash;fi;fi;fi;fi;fi bootdelay=0 bootfromnand=0 bootfromsd=mmcinfo; if fatload mmc 0 ${loadaddr} kernel.img; then run sddtb; setenv bootargs ${bootargs} bootfromsd; bootm; fi bootfromusb=usb start 0; if fatload usb 0 ${loadaddr} kernel.img; then run usbdtb; setenv bootargs ${bootargs} bootfromusb; bootm; fi bootmode_check=get_rebootmode; echo reboot_mode=${reboot_mode};if test ${reboot_mode} = factory_reset; then defenv_reserv;setenv upgrade_step 2; save;fi; cmdline_keys=if keyman init 0x1234; then if sec_keyunify read mac ${loadaddr} str; then setenv bootargs ${bootargs} mac=${mac} androidboot.mac=${mac};fi;fi; ...
可以看到其中的 bootfromnand 变量是用于控制设备的启动顺序, 如果值为1, 那么从nand(设备内部存储, eMMC等), 如果值为0, 那么依次从sd, 从usb启动, 在这个过程中如果某个介质可以启动了, 就把这个方式加到bootargs变量的值当中去, 例如
1 setenv bootargs ${bootargs} bootfromsd;