修改镜像以及编程实现了从服务器买来上电就会自动化安装指定 ip 和 hostname 的步骤(包含了自动做raid),全程非交互
先讲讲事情的由来,新节点建设,几百台服务器得人为安装系统,虽说服务器有带外 ipmi,但是 raid 和安装系统时候 hostname 和ip啥的得去配置。系统镜像还是修改过的,安装界面的菜单自动应答通用的流程还不行,于是决定看看能不能研究出来。
1
2
3
hostname 序列号 IPMI IP/mask IPMI 网关 管理IP/MASK 管理网关 机器型号 test1 210200A00QH18500xxxx 10.0.23.34/24 10.0.23.1 10.0.23.41/24 10.0.23.1 xxx ....
然后设备接网线上电后全部自动做raid和安装系统和配置好自己应该配置的那个ip和hostname(而不是装完系统后dhcp上线,而且服务器最少都是八个网口,四个光口和四个电口)
文章不太会发图片,因为很多中途看的一些资料都过时了导致我走了弯路,以及没有稳定图床,所以我会把图放在我 github 上在文章里引入,如果不能访问 github 可能会看不到图。而且服务器安装系统界面那个终端里尝试的命令里一些文本输出无法复制出来,因为没网(虽然后面理解了手动配置了)
安装主要麻烦的是这个交互得频繁人为去输入,ubuntu 这个是叫 preseed 而不是 kickstart,经过多方查阅资料,发现安装的菜单定义文件可以在安装完系统后/var/log/machineInstaller/cdebconf/templates.dat找到(https://www.debian.org/releases/stable/amd64/apbs03.html.zh-cn 该文档说明了也可能安装完会删除)
找不到的话使用命令查找find / -not \( -path /proc -prune \) -not \( -path /var/lib/docker -prune \) -type f -name templates.dat在ubuntu18.04.2会得出两个文件
1
2
/var/log/installer/cdebconf/templates.dat /var/cache/debconf/templates.dat
第一个文件是菜单文件,第二个是相关的值
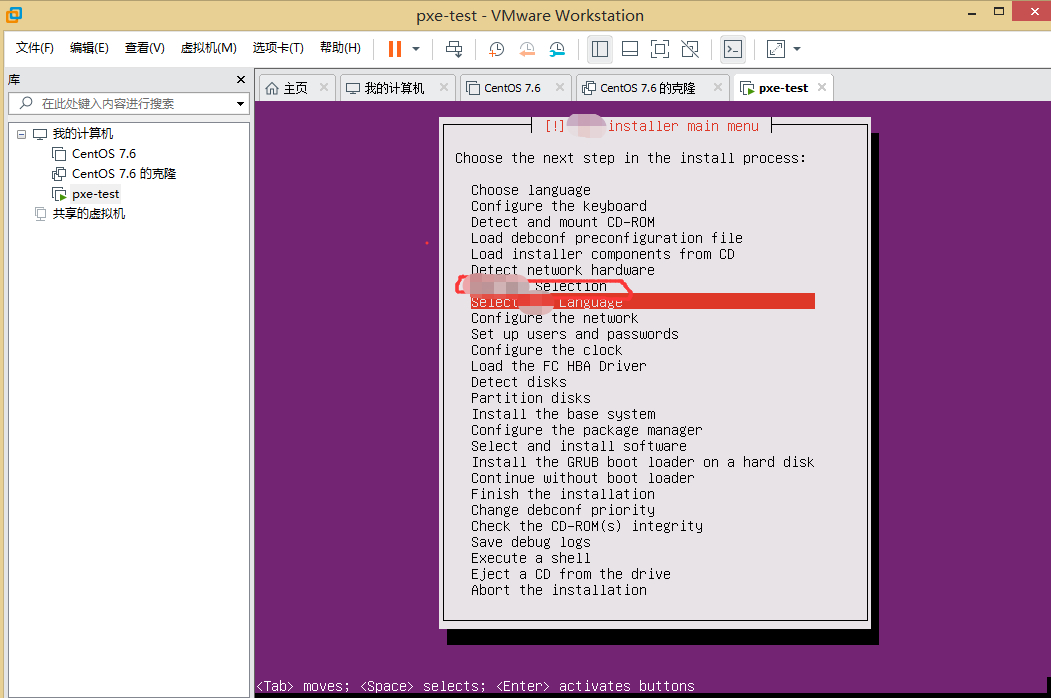
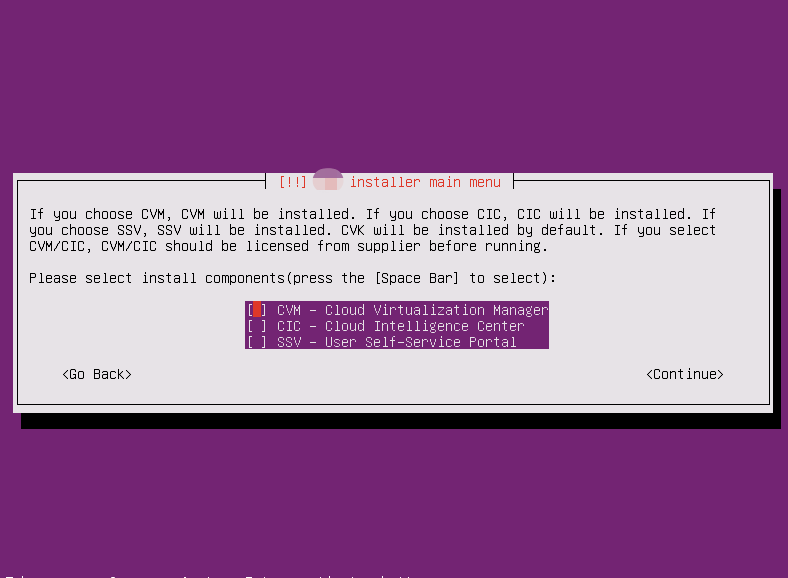
对于上面那个选择的界面,我们可以用grep根据关键字找到如下内容
1
2
3
4
5
6
7
8
9
$ grep -6 SSV /var/log/machineInstaller/cdebconf/templates.dat ... Name: xxx-xxx-selection/install Type: multiselect Choices: CVM - Cloud Virtualization Manager, CIC - Cloud Intelligence Center, SSV - User Self-Service Portal Description: Please select install components(press the [Space Bar] to select): Extended_description: If you choose CVM, CVM will be installed. If you choose CIC, CIC will be installed. If you choose SSV, SSV will be installed. CVK will be installed by default. If you select CVM/CIC, CVM/CIC should be licensed from supplier before running. Choices-C: CVM, CIC, SSV ...
这个就是菜单来源,查阅资料https://www.debian.org/releases/stable/amd64/apb.html.zh-cn http://ftp.gnome.org/pub/debian-meetings/2006/debconf6/slides/Debian_installer_workshop-Frans_Pop/paper/index.html
1 <owner> <question name> <question type> <value>
owner基本上都是debian-installer,直接写d-i即可,而为<question type>下面这些
1
2
3
4
5
6
7
8
9
10
11
12
13
$ grep -P '^Type' /var/log/machineInstaller/cdebconf/templates.dat | sort -u Type: boolean Type: detect-keyboard Type: entropy Type: error Type: multiselect Type: note Type: password Type: select Type: string Type: terminal Type: text Type: title
各个type见文档 http://www.fifi.org/doc/debconf-doc/tutorial.html 里的Table 1. Available data types
1 d-i xxx-xxx-selection/install select CVM
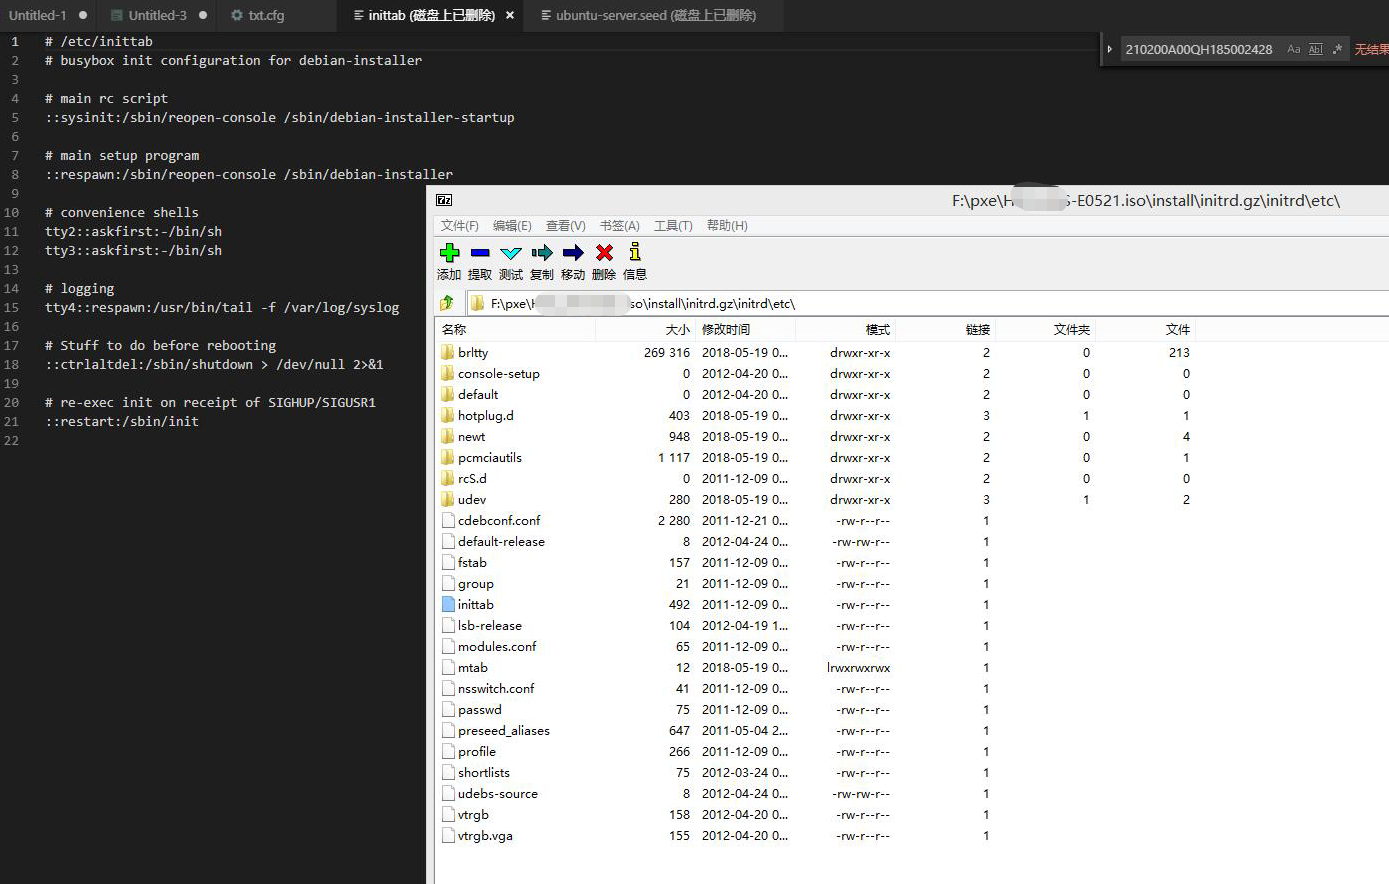
iso解开的目录/preseed下有一堆seed文件可以参考,preseed文件会写了的话我们得修改内核参数让安装器使用我们的preseed文件应答。
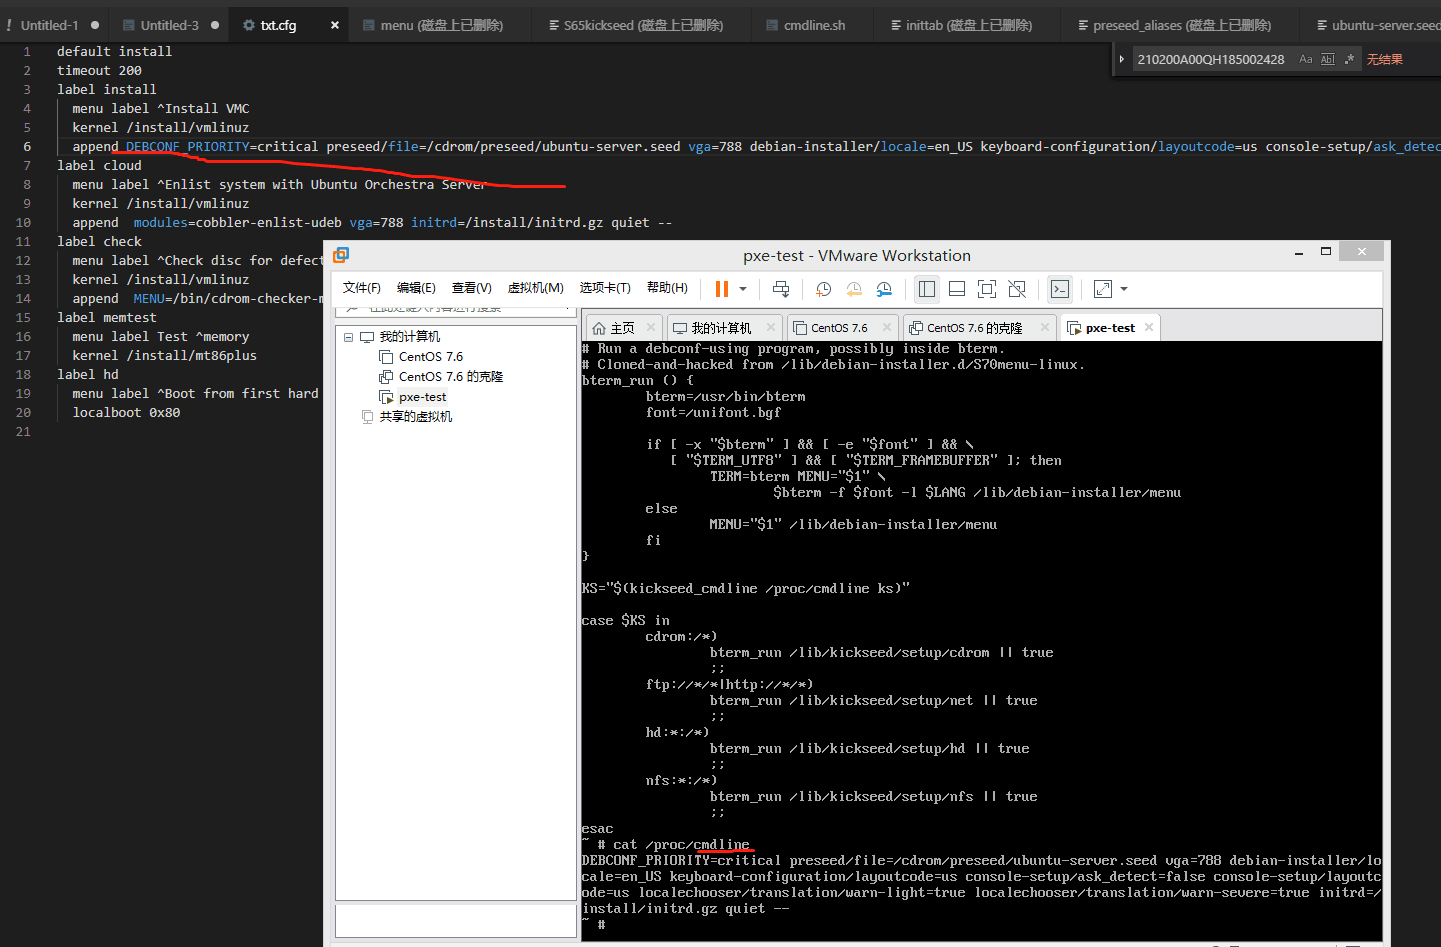
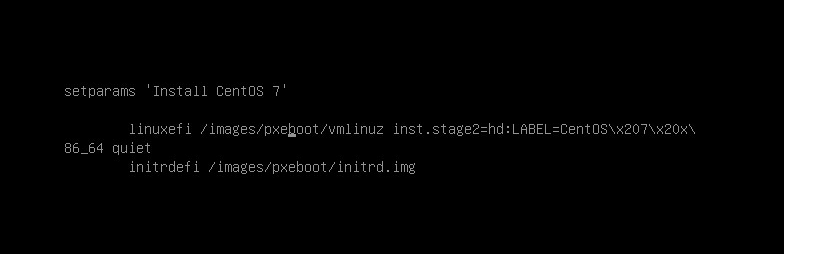
菜单的内容是在镜像的isolinux/txt.cfg里:
1
2
3
4
5
6
7
8
9
10
11
12
13
14
15
16
17
18
19
20
21
default install # 默认启动的是 'label install' 中标记的启动内核 prompt 1 # 开启会显示命令行'boot: '提示符。prompt值为0时则不提示,将会直接启动'default'参数中指定的内容。 timeout 200 # 超时会自动选择default选择 label install menu label ^Install VMC kernel /install/vmlinuz append DEBCONF_PRIORITY=critical preseed/file=/cdrom/preseed/ubuntu-server.seed vga=788 debian-installer/locale=en_US keyboard-configuration/layoutcode=us console-setup/ask_detect=false console-setup/layoutcode=us localechooser/translation/warn-light=true localechooser/translation/warn-severe=true initrd=/install/initrd.gz quiet -- label cloud menu label ^Enlist system with Ubuntu Orchestra Server kernel /install/vmlinuz append modules=cobbler-enlist-udeb vga=788 initrd=/install/initrd.gz quiet -- label check menu label ^Check disc for defects kernel /install/vmlinuz append MENU=/bin/cdrom-checker-menu vga=788 initrd=/install/initrd.gz quiet -- label memtest menu label Test ^memory kernel /install/mt86plus label hd menu label ^Boot from first hard disk localboot 0x80
其中的append段是传递给vmlinuz的内核参数,最后的--后面是传递给后续安装完的内核的参数,preseed/file=后面可以写cdrom,至于vmlinuz和initrd是干啥用的详细可以看看下面的https://blog.51cto.com/smileyouth/1268810 https://blog.csdn.net/yangxuan12580/article/details/51372632
简单来讲就是BIOS加电自检 –> 运行isolinux目录下面的isolinux.bin文件,这个isolinux.bin文件根据isolinux.cfg文件的选项来加载内核vmlinuz和initrd.img文件,initrd.img文件会在内存中生成一个虚拟的linux操作系统,为安装过程提供一个安装环境 -> 执行initrd这个rootfs的/init
这个initrd在安装的时候可以ctrl+shift+f2进到终端里,查看了下进程发现了好像是个busybox,下面一篇文章是busybox的init干了些啥的文章https://blog.csdn.net/yangxuan12580/article/details/51372632
简单的看了下里面shell的调用流程找到了这个,append的参数会在/proc/cmdline里,另外ks或者preseed文件不一定需要放在cdrom里,也可以网络上,如果是网络的话在获取之前会尝试以所有的网卡dhcp获取ip,获取到了就会去下载
最终实现了自动应答(这里先不追求每个机器配置的ip应该不通),然后同事告诉我们新节点的镜像后续用centos,我就放下了ubuntu,自己准备摸索下centos的
后面按照这个文章了解了下pxehttps://linuxgeeks.github.io/2018/01/22/162310-Kickstart%E6%97%A0%E4%BA%BA%E5%80%BC%E5%AE%88%E5%AE%89%E8%A3%85CentOS6.8/
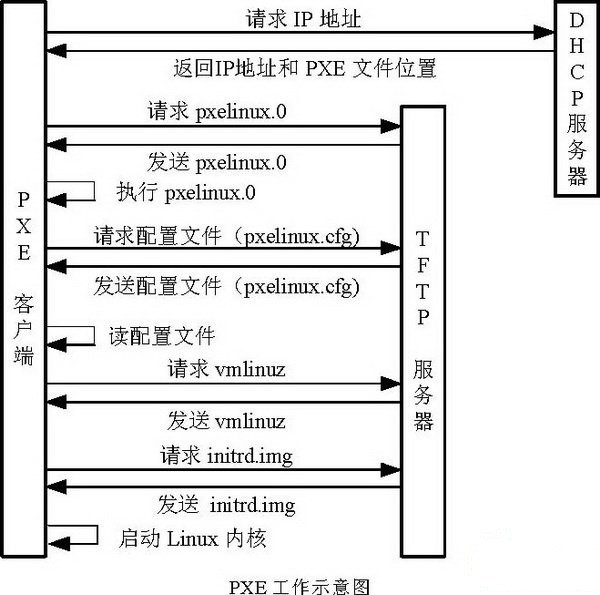
pxe启动步骤就是如上图,需要配置一个tftp,让类似于安装界面安装包的时候从tftp上去下载,vmlinuz和initrd均是从tftp上下载
步骤比较简单,然后用vmware开两台虚机测试了下可行,然后主要是应答,我就直接拿物理服务器nfs挂载centos的iso去看看centos的自动应答咋整。
1.人为清点服务器,写好所有服务器的序列号,ipmi和系统应该配置的信息,然后服务器贴好hostname的标签上架好布好线
2.服务器ipmi的硬件网口接网线后会dhcp上线随机分配一个ip
3.写一个cli或者脚本ssh交换机获取arp信息。扫描机器序列号是否在excel里(这步防止全部操作了不必要的服务器,后期也可以判断加扩展),是就用SMASH CLP设置ipmi网络信息设置从nfs指定iso启动,并且在excel里记录服务器的四个电口mac地址
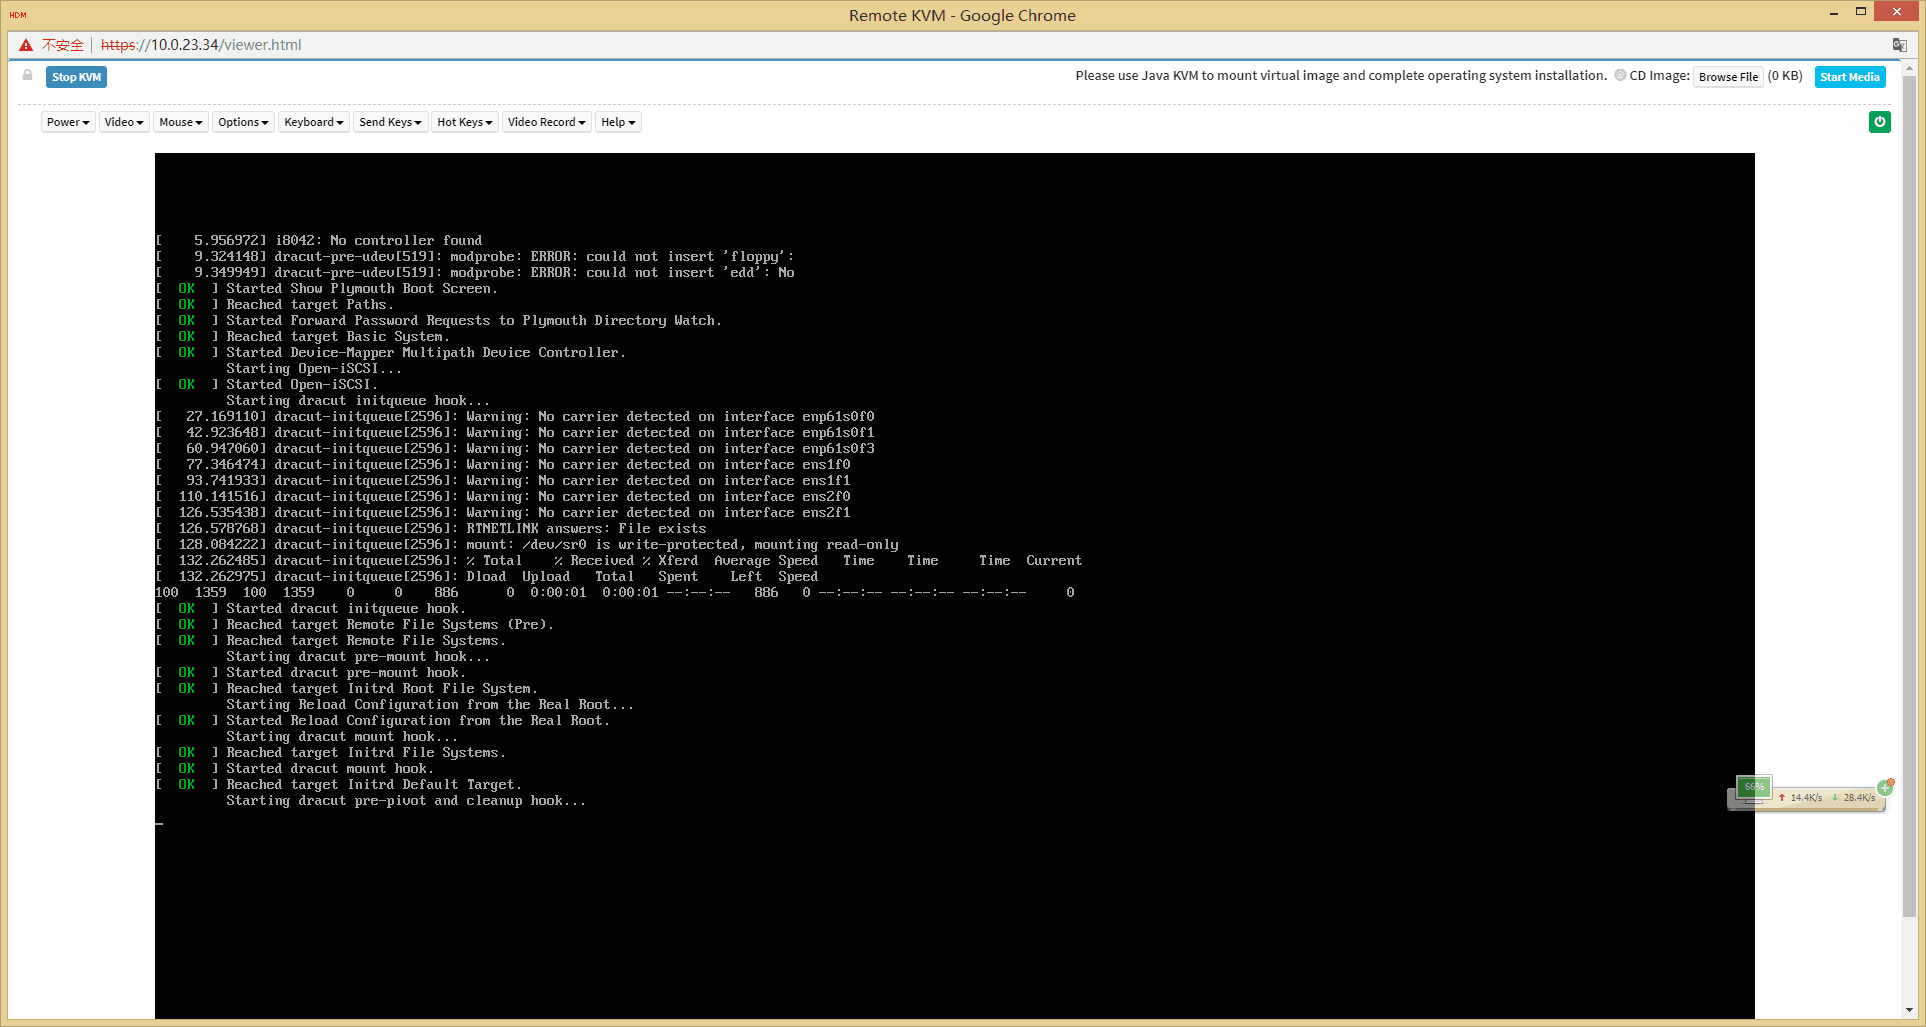
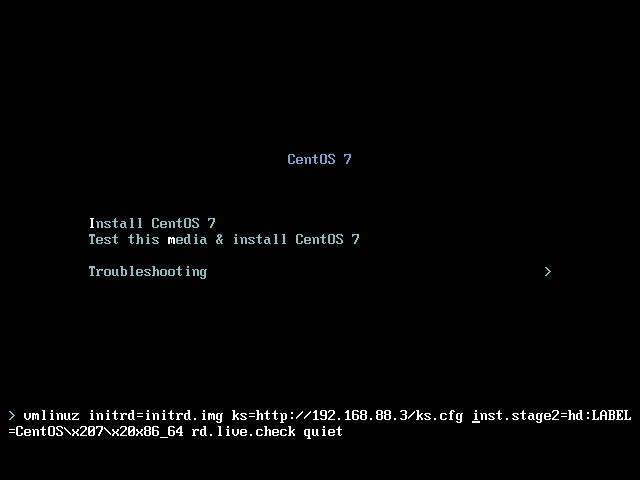
4.启动的iso里指定了kickstart文件,然后服务器在安装界面出来之前会dhcp获取ip去下载ks文件,而dhcp上线的mac就是四张电口的mac地址之一。获取ip是每个网口尝试去发dhcp请求,如下图实际上这个物理机我只连线了一个电口,电口网卡名为enp61s0f2,获取到了ip就会下载ks文件,那个speed相关就是curl下载的进度输出。
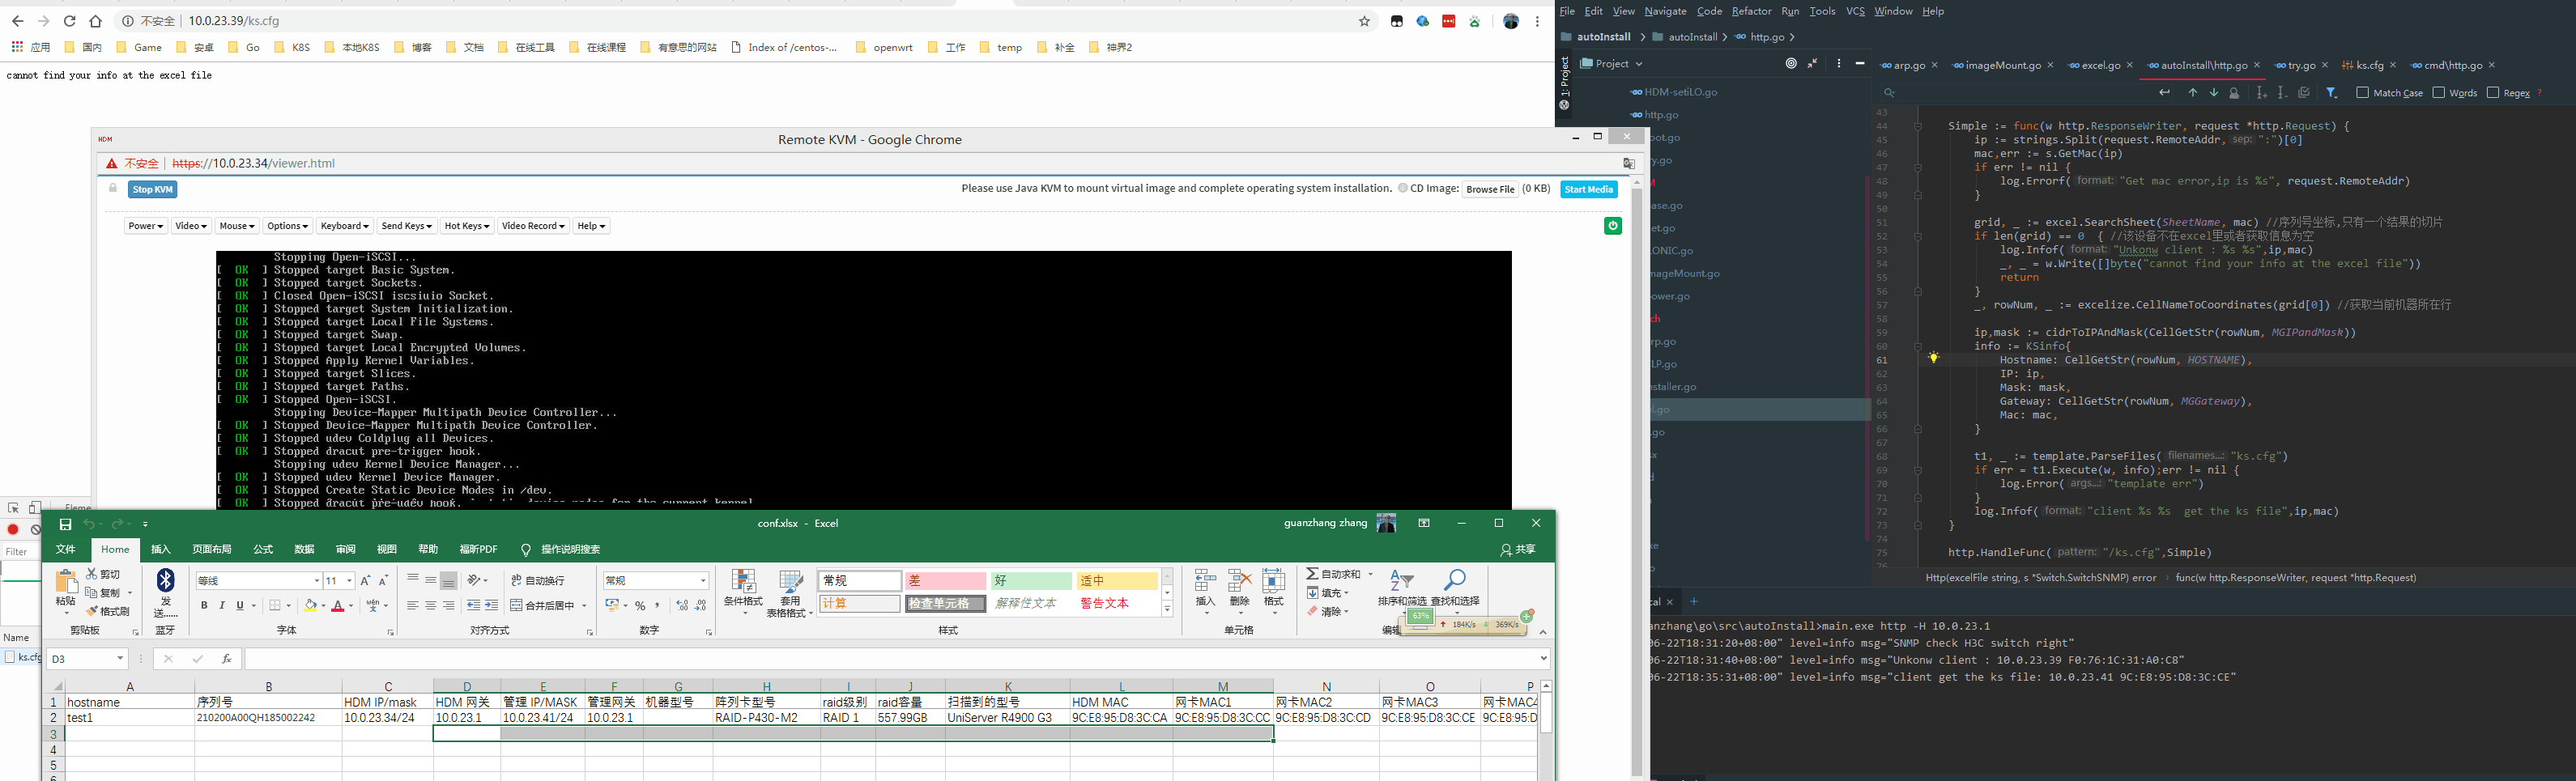
5.dhcp得到ip后从我这web拿ks文件,我这web返回ks文件之前那客户端的来源ip去连接交换机查客户端的mac地址(因为此时对于每一台服务器的来源ip不是固定的,mac地址是固定的),查到mac地址后在excel看来源mac地址是那行确定了是哪个机器,返回渲染的ks文件(文件里渲染了ip和hostname之类的信息),服务器会自动安装和设置
主要是从第三部开始实现,SMASH CLP就是ssh执行命令,里面路径信息得自己去找,具体的一些找过的资料可以看我另一个文章里的链接 https://zhangguanzhang.github.io/2019/06/12/CLP/ 。net/http包,excel用的github.com/360EntSecGroup-Skylar/excelize/v2国人开发的包,主要是由自己的example文档界面 https://xuri.me/excelize/zh-hans/utils.html#CellNameToCoordinates 。ssh操作交换机找了下找到了一个大佬写的包,把其中连接交换机执行命令的部分给扣出来使用,但是字符串提取dis arp的纯ip和mac部分文本遇到了诡异的问题,想着按照\n去split成切片然后去掉前面两个和最后一个就是纯arp列表了,然后每行按照空格split下就能提取到ip和mac了
1
2
3
4
5
6
7
Type: S-Static D-Dynamic O-Openflow R-Rule I-Invalid IP address MAC address SVLAN/VSI Interface/Link ID Aging Type 10.254.250.250 dcda-80fb-b321 -- GE1/0/0 10 D 61.181.149.xxx 4c09-b4f4-c7f1 -- GE1/0/2 20 D 10.0.6.253 a80c-0d00-26d4 -- GE1/0/3 16 D 10.101.1.2 3cf5-cc94-155a 20 GE1/0/4 8 D <FW-IT-TJ>
但是当时打印了是split后切片元素值不对,以为是库的问题给大佬发了好友请求,想咨询下大佬,后续自己找到问题了,是因为交换机的换行是\r,这里就不放代码了。后续加上大佬交流了下,把整个思路给他说了下,他说没必要ssh交换机,你只是获取信息用snmp就行了。之前对于snmp也是只知道有个mib库和oid啥的,具体干啥的不清楚。查阅了相关资料明白了 https://blog.csdn.net/zqixiao_09/article/details/77127448
1
2
3
4
5
6
<FW-IT-TJ>dis current-configuration | include snmp snmp-agent snmp-agent local-engineid 800063A28088DF9E7356xxxxxxxx snmp-agent community read public snmp-agent sys-info version v2c v3 <FW-IT-TJ>
现在来讲所有的网络设备都支持snmp ,协议版本号都是v2居多,v3认证挺严格的一般用的太少。community read后面的字符串就是v2协议下认证的口令,默认是public。snmpwalk连接格式为下面
1 snmpwalk -v<协议版本> -c <community string> <网络设备的登陆ip> <对象标识符,也就是oid>
协议版本号为 1|2c|3,我们用2就写2c
1 snmpwalk -v2c -c public 10.0.23.1 .
命令输出的信息会非常多,因为我们的oid写的是一个点,oid实际上就是一个mib树的路径
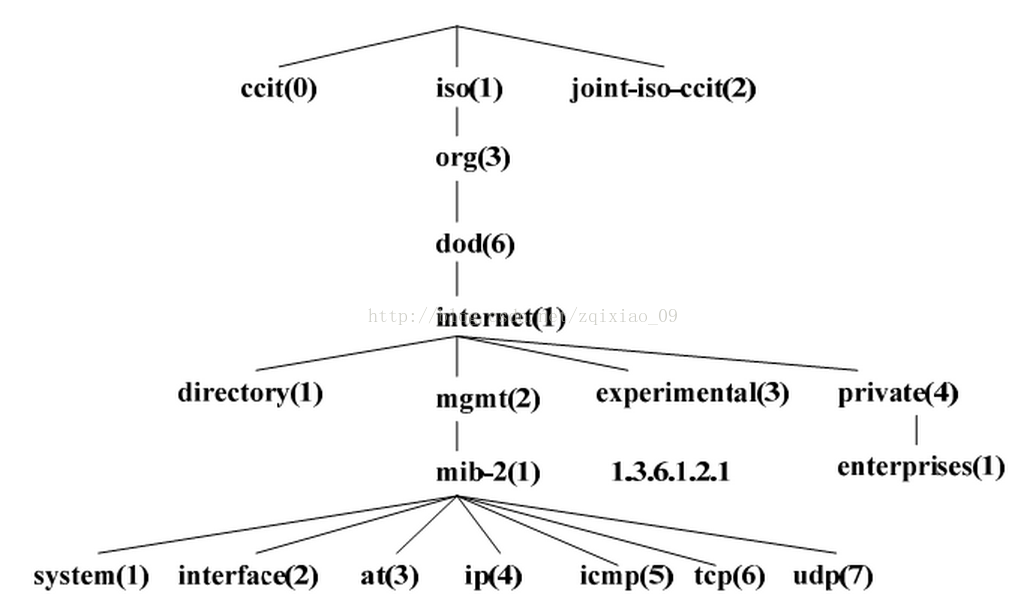
比如我们要查询系统信息,就是左下角,oid为.1.3.6.1.2.1.1,walk一下测试看看
1
2
3
4
5
6
7
8
9
10
$ snmpwalk -v2c -c public 10.0.23.1 .1.3.6.1.2.1.1 SNMPv2-MIB::sysDescr.0 = STRING: H3C Comware Platform Software, Software Version 7.1.070, Release 2510P02 H3C S6800-54QF Copyright (c) 2004-2017 New H3C Technologies Co., Ltd. All rights reserved. SNMPv2-MIB::sysObjectID.0 = OID: SNMPv2-SMI::enterprises.25506.1.1733 DISMAN-EVENT-MIB::sysUpTimeInstance = Timeticks: (1045202613) 120 days, 23:20:26.13 SNMPv2-MIB::sysContact.0 = STRING: New H3C Technologies Co., Ltd. SNMPv2-MIB::sysName.0 = STRING: IT_S6800-54QF SNMPv2-MIB::sysLocation.0 = STRING: Hangzhou, China SNMPv2-MIB::sysServices.0 = INTEGER: 78
这些基本都是通用的,遵循着上图的那个树,但是具体的信息好像得看厂家的设计,例如arp在ip下面,搜索了下华三交换机的arp oid为.1.3.6.1.2.1.4.22.1.2。
按e编辑修改参数加入ks文件,这个ks的web是我用虚机nginx搭建的,这里编辑可以防止去修改iso改菜单加参数。因为我笔记本偶尔wifi,偶尔网线,我虚机是桥接的ip会变化,所以改镜像很麻烦,这里我直接e或者tab编辑手写参数先测试。总之实现的流程是这样:
1.人为清点服务器,写好所有服务器的序列号,ipmi和系统应该配置的信息,然后服务器贴好hostname的标签上架好布好线
2.服务器ipmi的硬件网口接网线后会dhcp上线随机分配一个ip
3.cli snmp交换机获取arp信息。扫描机器序列号是否在excel里(这步防止全部操作了不必要的服务器,后期也可以判断加扩展),是就用http api设置从nfs指定iso启动,并且在excel里记录服务器的四个电口mac地址,并且设置ipmi的网络信息(因为此时的ipmi硬件是dhcp上线的,不符合表格里的最终设置ip)
4.启动的iso是修改过的,里面参数里指定了kickstart文件,然后服务器在安装界面出来之前会dhcp获取ip去下载ks文件,文件的url是我的web server,返回ks文件之前会查询
5.dhcp得到ip后从我这web拿ks文件,我这web返回ks文件之前那客户端的来源ip去连接交换机查客户端的mac地址(因为此时对于每一台服务器的来源ip不是固定的,mac地址是固定的),查到mac地址后在excel看来源mac地址是那行确定了是哪个机器,返回渲染的ks文件(文件里渲染了ip和hostname之类的信息),服务器会自动安装和设置
ks里返回前是用go的html/tempalte渲染的,模板部分是下面的
1
2
3
4
5
6
{{if and .IP .Mask .Gateway}} network --bootproto=static --device=enp61s0f2 --ip {{.IP}} --netmask {{.Mask}} --gateway {{.Gateway}} --onboot=yes {{else}} network --bootproto=dhcp --device=enp61s0f2 --onboot=yes --ipv6=auto --no-activate {{end}} network --hostname={{if .Hostname }}{{.Hostname}}{{else}}{{.Mac}}{{end}}
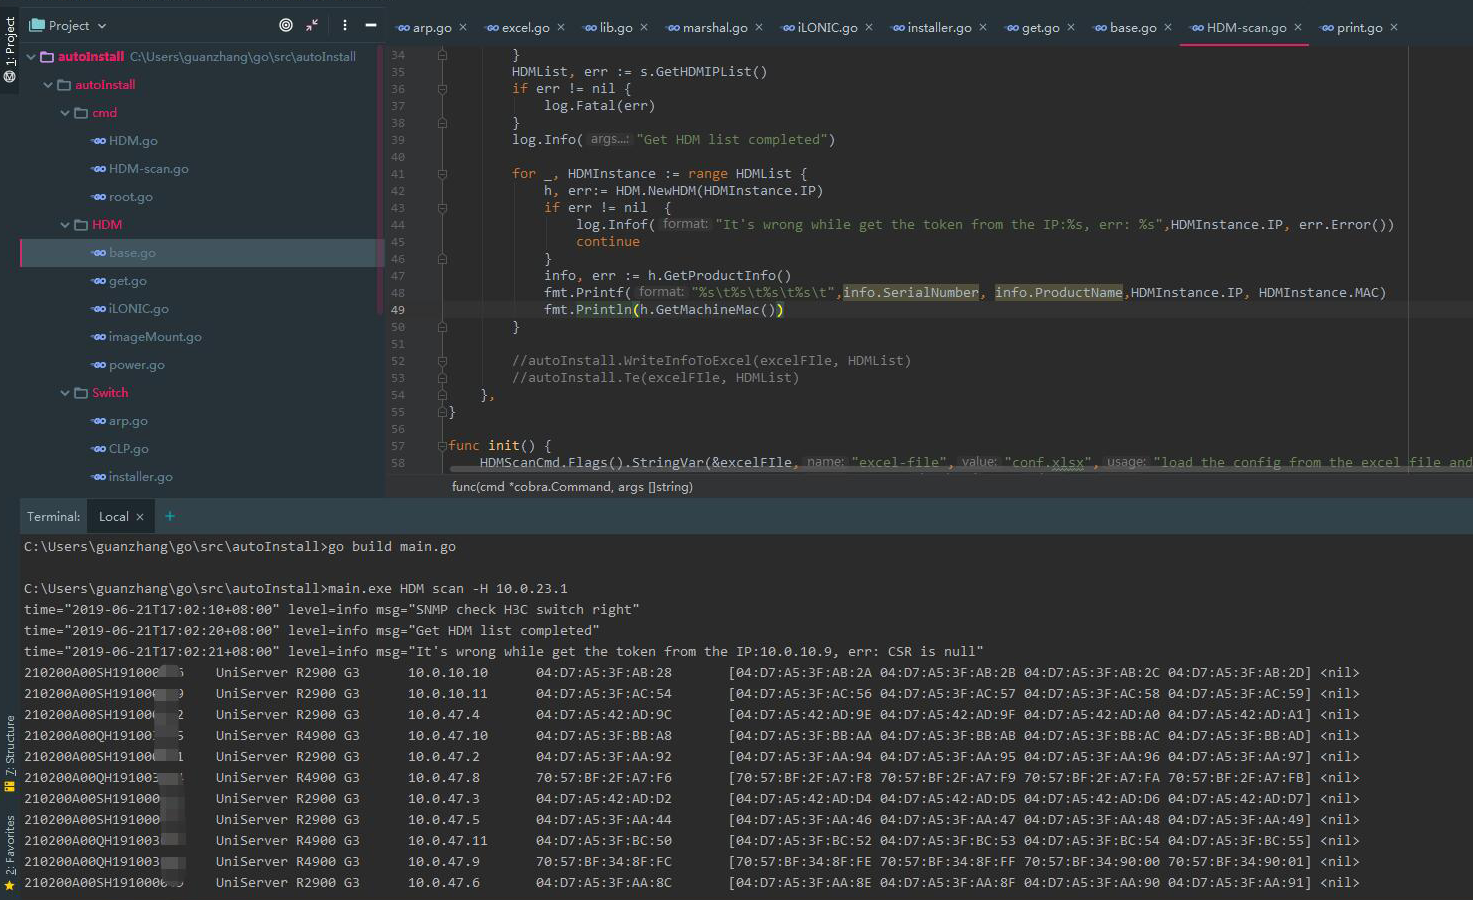
这个时候实现的cli分了阶段,初次是扫描交换机扫描出在表格里的服务器,也就是上面图的H后面的列信息获取了写到excel里
因为我excel里只有我那台测试机器,办公网里实际上还有其他的服务器,由于他们的序列号不在excel里所以不会被填入到excel里和设置启动啥的。第二阶段就是cli启动http让机器获取ks文件,现在其实每个机器返回不同的ks文件都解决了,但是raid还是解决不了。
raid部分查阅了挺多的资料的,因为华三的ipmi没有cli连接方式去设置raid,初期搜索的关键词都是uefi shell做raid,找到的资料都是其他厂商的,例如hp的有efi shell(可以在启动顺序选择uefi shell之类的进入)里做raid的脚本,efi看了下需要c去编程https://www.manualshelf.com/manual/hp/hp-z420-workstation/creating-raid-arrays-in-the-efi-shell-white-paper/page-3.html https://support.hpe.com/hpsc/doc/public/display?docId=emr_na-c03886480&docLocale=zh_CN https://support.hpe.com/hpsc/doc/public/display?docId=c04398273 http://h17007.www1.hpe.com/docs/iss/proliant_uefi/UEFI_Moonshot_103117/s_sysconfig_attrib.html https://blog.csdn.net/thewayma/article/details/4588182 https://blog.csdn.net/lizhihua0925/article/details/53198483
uefi启动的话我们按e进入编辑界面发现路径为图里的,我们打开镜像发现了这些文件,hp在efi shell界面的配置raid是因为他们专门的人员去开发了下面图里类似的xxx.efi文件
后续搜索资料无意中搜到了个pxe自动做raid的文章: https://blog.csdn.net/lizhihua0925/article/details/53198483
一般服务器对应的为这些cli
如果是要下载storcli可以去博通官网https://www.broadcom.com搜索sotrcli下载`Latest MegaRAID Storcli`
其他的厂商就不知道啥命令了,大家自行摸索,我这里查到是Adaptec的
1
2
$ dmesg | grep -i raid [ 4.058107] Adaptec aacraid driver 1.2.1[50877]-custom
arcconf安装在yum源里是没有的,Adaptec现在改名为Microsemi,下载arcconf的话去官网 https://storage.microsemi.com/en-us/downloads/ 进所有产品->Adaptec SCSI RAID -> Adaptec Series 8 SAS/SATA 12 Gb RAID Storage Manager Downloads -> Downloads Microsemi Adaptec ARCCONF Command Line Utility v3.01.23531
里面有rpm包安装了即可, 下面是我这台测试的物理机安装了后的操作,查看物理卷
1
2
3
4
5
6
7
8
9
10
11
12
13
14
15
16
17
18
19
20
21
22
23
24
25
26
27
28
29
30
31
32
33
34
35
36
37
38
39
40
41
42
43
44
45
46
47
48
49
50
51
52
53
54
55
56
57
58
59
60
61
62
63
64
65
66
67
68
69
70
71
72
73
74
75
76
77
78
79
80
81
82
83
84
85
86
87
88
89
90
91
92
93
94
95
96
97
98
99
100
101
102
103
104
105
106
107
108
109
110
111
112
113
114
$ arcconf getconfig 1 pd Controllers found: 1 ---------------------------------------------------------------------- Physical Device information ---------------------------------------------------------------------- Device #0 Device is a Hard drive State : Online Block Size : 512 Bytes Supported : Yes Programmed Max Speed : SAS 12.0 Gb/s Transfer Speed : SAS 12.0 Gb/s Reported Channel,Device(T:L) : 0,0(0:0) Reported Location : Enclosure 0, Slot 0(Connector 0) Reported ESD(T:L) : 2,0(0:0) Vendor : SEAGATE Model : ST600MM0208 Firmware : N001 Serial number : W0M0P1CK0000E8228T49 World-wide name : 5000C500A13EBBC0 Reserved Size : 956312 KB Used Size : 571391 MB Unused Size : 1 MB Total Size : 572325 MB Write Cache : Disabled (write-through) FRU : None S.M.A.R.T. : No S.M.A.R.T. warnings : 0 Power State : Full rpm Supported Power States : Full rpm,Powered off SSD : No Temperature : 20 C/ 68 F ---------------------------------------------------------------- Device Phy Information ---------------------------------------------------------------- Phy #0 PHY Identifier : 0 SAS Address : 5000C500A13EBBC1 Attached PHY Identifier : 3 Attached SAS Address : 560DA833FB704000 Phy #1 PHY Identifier : 1 SAS Address : 5000C500A13EBBC2 ---------------------------------------------------------------- Runtime Error Counters ---------------------------------------------------------------- Hardware Error Count : 0 Medium Error Count : 0 Parity Error Count : 0 Link Failure Count : 0 Aborted Command Count : 0 SMART Warning Count : 0 Device #1 Device is a Hard drive State : Online Block Size : 512 Bytes Supported : Yes Programmed Max Speed : SAS 12.0 Gb/s Transfer Speed : SAS 12.0 Gb/s Reported Channel,Device(T:L) : 0,1(1:0) Reported Location : Enclosure 0, Slot 1(Connector 0) Reported ESD(T:L) : 2,0(0:0) Vendor : SEAGATE Model : ST600MM0208 Firmware : N001 Serial number : W0M0MRP60000E8229ZTR World-wide name : 5000C500A13E6E5C Reserved Size : 956312 KB Used Size : 571391 MB Unused Size : 1 MB Total Size : 572325 MB Write Cache : Disabled (write-through) FRU : None S.M.A.R.T. : No S.M.A.R.T. warnings : 0 Power State : Full rpm Supported Power States : Full rpm,Powered off SSD : No Temperature : 20 C/ 68 F ---------------------------------------------------------------- Device Phy Information ---------------------------------------------------------------- Phy #0 PHY Identifier : 0 SAS Address : 5000C500A13E6E5D Attached PHY Identifier : 2 Attached SAS Address : 560DA833FB704000 Phy #1 PHY Identifier : 1 SAS Address : 5000C500A13E6E5E ---------------------------------------------------------------- Runtime Error Counters ---------------------------------------------------------------- Hardware Error Count : 0 Medium Error Count : 0 Parity Error Count : 0 Link Failure Count : 0 Aborted Command Count : 0 SMART Warning Count : 0 Device #2 Device is an Enclosure Services Device Reported Channel,Device(T:L) : 2,0(0:0) Enclosure ID : 0 Type : SES2 Vendor : ADAPTEC Model : Virtual SGPIO Firmware : 1 Status of Enclosure Services Device Speaker status : Not Available Command completed successfully.
可以看到两个硬盘,实际上也是只有两块硬盘,而Device #2不是属于硬盘,属于自带的一个抽象的东西,具体是啥不清楚,查看raid
1
2
3
4
5
6
7
8
9
10
11
12
13
14
15
16
17
18
19
20
21
22
23
24
25
26
27
28
29
30
31
32
33
34
$ arcconf getconfig 1 LD Controllers found: 1 ---------------------------------------------------------------------- Logical device information ---------------------------------------------------------------------- Logical Device number 0 Logical Device name : DefaultValue0 Block Size of member drives : 512 Bytes RAID level : 1 Unique Identifier : B091F52F Status of Logical Device : Optimal Additional details : Quick initialized Size : 571381 MB Parity space : 571391 MB Interface Type : Serial Attached SCSI Device Type : HDD Read-cache setting : Enabled Read-cache status : On Write-cache setting : On when protected by battery/ZMM Write-cache status : On Partitioned : Yes Protected by Hot-Spare : No Bootable : Yes Failed stripes : No Power settings : Disabled -------------------------------------------------------- Logical Device segment information -------------------------------------------------------- Segment 0 : Present (572325MB, SAS, HDD, Enclosure:0, Slot:0) W0M0P1CK0000E8228T49 Segment 1 : Present (572325MB, SAS, HDD, Enclosure:0, Slot:1) W0M0MRP60000E8229ZTR Command completed successfully.
参照之前ubuntu的,分析了下centos的启动流程,机器bios设置的是uefi启动,启动流程为:
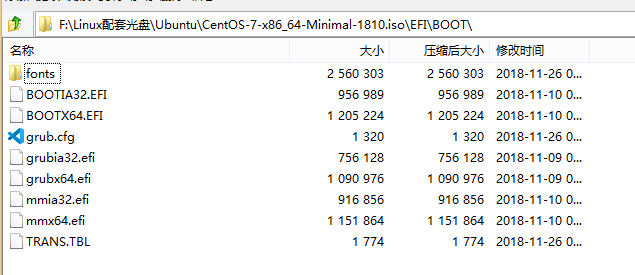
1 POST -> 镜像的EFI/BOOT/grub.cfg -> load 镜像里的内核/images/pxeboot/vmlinuz和加载/images/pxeboot/initrd.img -> 安装界面
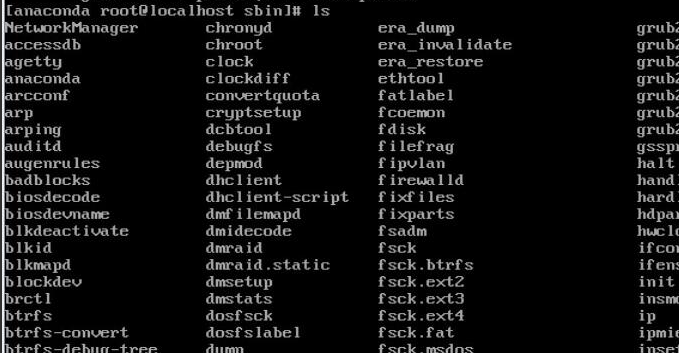
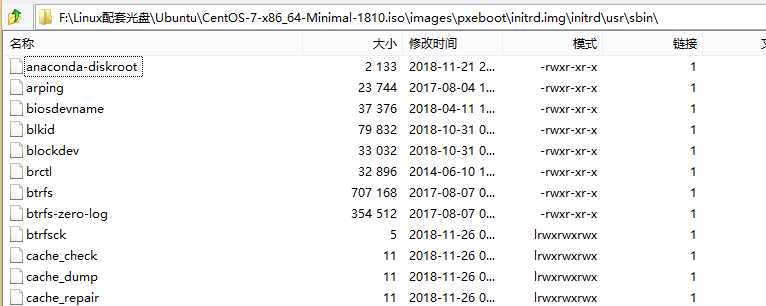
前面寻思着把arcconf命令整到这个initrd里,initrd是啥看前面那个Linux启动流程的文章,我们可以理解为内存内核vmlinuz的rootfs,但是最终实际上centos似乎多了个步骤,下图是物理机挂载了iso后安装界面ctrl+shift+f2切到终端后看/usr/sbin目录的可执行文件有哪些
但是我们看CentOS-7-x86_64-Minimal-1810.iso\images\pxeboot\initrd.img\initrd\usr\sbin\里的压根就没这些命令,起初我是把arcconf加到这个initrd里,最后安装界面切到终端里压根就没arcconf命令
vmlinuz内核加载initrd.img挂载成rootfs,然后读取append的参数做一些处理,
如果有kickstart会根据=后面的value前面看是啥开头。如果是非cdrom就会dhcp去retry每一张网卡去下载ks文件,
inst.stage2=参数: 指定要载入的安装程序运行时映像位置。其语法与 指定安装源 相同。这个选项需要包含有效.treeinfo文件的目录路径;如果发现这个文件,则会从这个文件中读取运行时映象位置。如果.treeinfo文件不可用,Anaconda 会尝试从LiveOS/squashfs.img中载入该映象。grub.cfg里的search --no-floppy --set=root -l 'CentOS 7 x86_64'会把带label=CentOS 7 x86_64的设置成root磁盘(这段很重要)
默认的append参数指定stage2为iso,最终安装界面的rootfs就是CentOS-7-x86_64-Minimal-1810.iso\LiveOS\squashfs.img\这个rootfs,这个squashfs.img是个高压缩的rootfs,挂载了它后chroot进去,最终它的rootfs才是我们在安装界面切换到的终端,我们没必要去修改initrd
这是我刚开始修改initrd的步骤https://wiki.gentoo.org/wiki/Custom_Initramfs
1
2
3
4
5
6
7
8
9
$ cd $ mkdir /root/test $ mount -t auto /dev/drom /mnt $ cp -ar /mnt /root/iso # 原来root下没有iso目录,拷贝过来重命名为iso $ umount /mnt $ cp iso/images/pxeboot/initrd.img test/ $ cd test $ xz -dc ../initrd.img | cpio -id 271820 blocks
修改一些东西后下面是打包
1
2
3
4
5
6
7
8
9
10
11
12
13
14
15
16
$ find . -print0 | cpio --null --create --verbose --format=newc | gzip --best > ../myinitrd $ yum install mkisofs isomd5sum -y $ cd iso #执行封装镜像的命令: $ mkisofs -U \ -A 'CentOS 7 x86_64' \ -V 'CentOS 7 x86_64' \ -volset 'CentOS 7 x86_64' \ -J -joliet-long -r -v -T \ -o /root/CentOS-MY.iso \ -b isolinux/isolinux.bin \ -c isolinux/boot.cat \ -no-emul-boot -boot-load-size 4 \ -boot-info-table \ -eltorito-alt-boot \ -e images/efiboot.img -no-emul-boot .
注意CentOS 7 x86_64这部分不能乱写,我看网上的基本都是乱写或者没详细说明的,导致了uefi启动压根就没识别到iso,这个字段必须得是grub.cfg里的字段。也就是因为那个inst.stage2=和search以及这里制作iso的要一致
1
2
$ grep search EFI/BOOT/grub.cfg search --no-floppy --set=root -l 'CentOS 7 x86_64'
这个字段对上了才能识别到iso,参考 https://access.redhat.com/discussions/762253
校验并写入 md5 值(可选):
1 $ implantisomd5 /root/CentOS-MY.iso
上面的镜像打包命令我们后续也会用到,实际上我们还是得要把arcconf弄到squashfs.img里,因为安装界面对比/usr/sbin里文件就会发现是squashfs.img这个rootfs。此时物理机是安装界面,我切到终端配置了下ip和路由,然后把我安装了arcconf的虚机的命令拷贝到物理机上,因为这个rootfs相比initrd多了很多依赖,我们测试看看能不能使用
1
2
3
4
5
6
7
8
9
10
11
12
13
$ ip addr add 10.0.23.41/24 dev enp61s0f2 $ route add -net 0.0.0.0/0 gw 10.0.23.1 dev enp61s0f2 $ scp 10.0.23.79:/usr/sbin/arcconf /usr/sbin/ $ arcconf getconfig 1 ld Controllers found: 1 -------------------------------------------------------------- Logical device infomation -------------------------------------------------------------- No logical devices configured Command completed successfully.
命令测试可用,我们后面直接修改squashfs.img添加/usr/sbin/arcconf后打包即可。
1
2
3
4
5
6
7
8
9
10
11
12
13
14
15
16
17
18
19
20
$ cd /lib64 $ ldd /usr/sbin/arcconf linux-vdso.so.1 => (0x00007ffc8a548000) libdl.so.2 => /lib64/libdl.so.2 (0x00007fb1fdeee000) libpthread.so.0 => /lib64/libpthread.so.0 (0x00007fb1fdcd2000) libstdc++.so.6 => /lib64/libstdc++.so.6 (0x00007fb1fd9cb000) libm.so.6 => /lib64/libm.so.6 (0x00007fb1fd6c9000) libgcc_s.so.1 => /lib64/libgcc_s.so.1 (0x00007fb1fd4b3000) libc.so.6 => /lib64/libc.so.6 (0x00007fb1fd0e6000) /lib64/ld-linux-x86-64.so.2 (0x00007fb1fe0f2000) $ echo md5sum $(ldd /usr/sbin/arcconf | grep -Po '/lib64/\K\S+') md5sum libdl.so.2 libpthread.so.0 libstdc++.so.6 libm.so.6 libgcc_s.so.1 libc.so.6 ld-linux-x86-64.so.2 $ md5sum libdl.so.2 libpthread.so.0 libstdc++.so.6 libm.so.6 libgcc_s.so.1 libc.so.6 ld-linux-x86-64.so.2 df69ee999269a70ee78fed4d39b6ab0a libdl.so.2 390e1ad4fd8b47508a0b80799acf83bf libpthread.so.0 bde5a21296b3dc19b0c374b324f97d4a libstdc++.so.6 0dc5febf77645a7d2e0b8aabbb85995d libm.so.6 ed3dac8e74ed913de13ee3dd7093e83e libgcc_s.so.1 03ce524a3e41c8f70daff7ca7a82f9ba libc.so.6 545bc0249fd1bee457dcec4bbda603b7 ld-linux-x86-64.so.2
自行看有没有对应的so和md5值一样,其中的linux-vdso.so.1不用管 https://blog.csdn.net/wang_xya/article/details/43985241
接下来修改squashfs.img添加arcconf
1
2
3
4
5
6
7
8
9
10
11
12
13
14
15
16
17
18
19
20
21
22
23
24
25
26
27
28
29
30
31
32
33
34
35
36
$ yum install livecd-tools -y $ cd /root/iso/LiveOS $ unsquashfs squashfs.img Parallel unsquashfs: Using 2 processors 1 inodes (16384 blocks) to write [=========================================================================================================================================================|] 16384/16384 100% created 1 files created 2 directories created 0 symlinks created 0 devices created 0 fifos $ mkdir /root/sq $ mount -t loop,rw squashfs-root/LiveOS/rootfs.img /root/sq $ cp /usr/sbin/arcconf /root/sq/usr/sbin/ $ umount /root/sq $ mv /root/iso/LiveOS/squashfs-root /root/sq/ $ cd /root/sq $ mksquashfs squashfs-root squashfs.img $ rm -rf squashfs-root $ mv squashfs.img /root/iso/LiveOS/ $ mv: overwrite ‘/root/iso/LiveOS/squashfs.img’? y $ cd /root/iso $ mkisofs -U \ -A 'CentOS 7 x86_64' \ -V 'CentOS 7 x86_64' \ -volset 'CentOS 7 x86_64' \ -J -joliet-long -r -v -T \ -o /root/CentOS-MY.iso \ -b isolinux/isolinux.bin \ -c isolinux/boot.cat \ -no-emul-boot -boot-load-size 4 \ -boot-info-table \ -eltorito-alt-boot \ -e images/efiboot.img -no-emul-boot .
把打包的iso放到我起的nfs里,在hdm的web上挂载它,在hdm远程里删掉阵列模拟机器刚出厂的时候,然后在安装界面进去测试命令可用。然后ks里增加创建阵列的逻辑
1
2
3
4
5
6
7
8
9
10
11
12
13
14
15
16
17
18
19
20
21
22
23
24
25
%pre arcconf getconfig 1 ld | grep -qw 'No logical' if [ "$?" -eq 0 ];then #获取实际硬盘的Channel id存成数组:0,1 0,0 hardDiskChannelIDArray=( $(arcconf getconfig 1 pd | grep Channel | tac | awk -F'[: ()]+' 'NR!=1{print $6}') ) arcconf task start 1 device all initialize noprompt #初始化所有硬盘 # 控制器id 容量 raid级别 arcconf create 1 logicaldrive max 1 ${hardDiskChannelIDArray[@]//,/ } noprompt fi ipmitool raw 0x0c 0x02 0x08 0x04 0x00 0x00 | grep -qw '02' // 专有网口我这为8,共享网口是0x01, 如果8是dhcp的话就配置静态ip if [ "$?" -eq 0 ];then ipmitool lan set 8 ipsrc static ipmitool lan set 8 ipaddr {{.IPMIIP}} ipmitool lan set 8 netmask {{.IPMIMask}} ipmitool lan set 8 defgw ipaddr {{.IPMIGW}} ipmitool chassis bootdev disk ipmitool raw 0x00 0x08 0x05 0xE0 0x08 0x00 0x00 0x00 //uefi启动,强制boot from disk fi %end
目前是做到这样,后续可能会更改,这几天发现了pxe似乎也可以达到需求,但是不能跨三层。pxe可以在pxelinux.cfg/目录下存放客户端的mac地址文件,客户端实际请求文件有优先级别.https://wiki.syslinux.org/wiki/index.php?title=PXELINUX 得出: 假设pxe一个客户端的uuid为b8945908-d6a6-41a9-611d-74a6ab80b83d,mac地址为88:99:AA:BB:CC:DD,获取到的ip为192.168.2.91
1
2
3
4
5
6
7
8
9
10
11
mybootdir/pxelinux.cfg/b8945908-d6a6-41a9-611d-74a6ab80b83d mybootdir/pxelinux.cfg/01-88-99-aa-bb-cc-dd mybootdir/pxelinux.cfg/C0A8025B mybootdir/pxelinux.cfg/C0A8025 mybootdir/pxelinux.cfg/C0A802 mybootdir/pxelinux.cfg/C0A80 mybootdir/pxelinux.cfg/C0A8 mybootdir/pxelinux.cfg/C0A mybootdir/pxelinux.cfg/C0 mybootdir/pxelinux.cfg/C mybootdir/pxelinux.cfg/default
后续的一些优化点走向
可以提前渲染好所有的文件,或者自己写一个tftp server,pxe客户端请求mac地址文件的时候查询有没有这个机器,有就返回渲染的文件。其次我现在是读写excel,后期可能会load到数据库里
再其次,ks的curl好像可以改initrd设置请求的header,pxe都是同一个dhcp下。tftp毕竟是四层,7层处理header结合数据库会非常方便,这样客户端自带header,http那部分逻辑就不需要去snmp连接交换机了
后续的ks也得加%post部分,部分curl请求一下我cli写的web server告知已经安装完成
squashfs.img里自带了ipmitool,应该在post里设置下ipmi的网络信息和bios的启动顺序啥的,而不应该在挂载iso之前设置
kickstart详细文档 https://fedoraproject.org/wiki/Anaconda/Kickstart/zh-cn
后续优化了的话会继续更新和公布源码在我github上
默认请求kickstart的header信息为:
1 map[Accept:[*/*] User-Agent:[curl/7.29.0] X-Anaconda-Architecture:[x86_64] X-Anaconda-System-Release:[CentOS]]
在/images/pxeboot/initrd.img/initrd/lib/dracut/hooks/initqueue/online/11-fetch-kickstart-net.sh 里找到了一个逻辑
1 2 3 4 5 6 if getargbool 0 inst.ks.sendmac kssendmac; then newjob=$hookdir /initqueue/settled/fetch-ks-${netif} .sh else newjob=$hookdir /initqueue/fetch-ks-${netif} .sh fi
我用grep查找这个getargbool函数是在usr/lib/dracut/hooks/initqueue/settled/00-anaconda-ks-sendheaders.sh里,内容为
1 2 3 4 5 6 7 8 9 10 11 12 13 14 15 16 17 18 19 20 21 22 23 24 25 26 27 28 29 30 31 32 [ -f /tmp/.ks_sendheaders ] && return command -v set_http_header >/dev/null || . /lib/url-lib.shif getargbool 0 kssendmac inst.ks.sendmac; then ifnum=0 for ifname in /sys/class/net/*; do [ -e "$ifname /address" ] || continue mac=$(cat $ifname /address) ifname=${ifname#/sys/class/net/} if [ "$ifname " != "lo" ] && [ -n "$mac " ]; then set_http_header "X-RHN-Provisioning-MAC-$ifnum " "$ifname $mac " ifnum=$(($ifnum +1 )) fi done fi if getargbool 0 kssendsn inst.ks.sendsn; then system_serial=$(cat /sys/class/dmi/id/product_serial 2>/dev/null) if [ -z "$system_serial " ]; then warn "inst.ks.sendsn: can't find system serial number" else set_http_header "X-System-Serial-Number" "$system_serial " fi fi > /tmp/.ks_sendheaders
boot的选项加了inst.ks.sendmac和inst.ks.sendsn后在curl请求ks文件的时候会附加header,所有网卡的mac地址和序列号。这个选项我搜了一圈,发现国内的和国外的基本很少用这个
这个是append的后面可以加的boot选项的官方文档https://access.redhat.com/documentation/zh-cn/red_hat_enterprise_linux/7/html/installation_guide/chap-anaconda-boot-options
1
2
3
4
5
6
7
8
9
10
11
12
13
"Accept": "[*/*]" "User-Agent": "curl/7.29.0" "X-Anaconda-Architecture: x86_64 "X-Anaconda-System-Release: "CentOS Linux" "X-Rhn-Provisioning-Mac-0: "enp61s0f0 9c:e8:95:d8:3c:cc" "X-Rhn-Provisioning-Mac-1: "enp61s0f1 9c:e8:95:d8:3c:cd" "X-Rhn-Provisioning-Mac-2: "enp61s0f2 9c:e8:95:d8:3c:ce" "X-Rhn-Provisioning-Mac-3: "enp61s0f3 9c:e8:95:d8:3c:cf" "X-Rhn-Provisioning-Mac-4: "ens1f0 3c:f5:cc:91:1f:68" "X-Rhn-Provisioning-Mac-5: "ens1f1 3c:f5:cc:91:1f:6a" "X-Rhn-Provisioning-Mac-6: "ens2f0 3c:f5:cc:91:1e:48" "X-Rhn-Provisioning-Mac-7: "ens2f1 3c:f5:cc:91:1e:4a" "X-System-Serial-Number: "210200A00QH18500xxxx"
看到这个序列号和我服务器居然一样,感觉所有文章在ks的web上做就行了
其他参考 https://blog.csdn.net/mintazoedeng/article/details/16804869 https://www.thegeekstuff.com/2009/07/how-to-view-modify-and-recreate-initrd-img/ https://access.redhat.com/documentation/zh-cn/red_hat_enterprise_linux/7/html/installation_guide/chap-installation-server-setup#sect-network-boot-setup-bios