zhangguanzhang's Blog

个人用 wireguard 笔记

字数统计: 3.3k阅读时长: 15 min
2020/08/05

作为 IT homelab 人员,经常需要连到家里的机器, openvpn 之类的配置麻烦啰嗦。这里写下 wireguard 的简单搭建。它比 IPSec 更快,更简单,更精简,更有用。它工作在内核态,比 OpenVPN 更高效。WireGuard 设计为通用 VPN,适用于多种不同情况。它是跨平台的,可大规模部署。

通常如下图的部署: 一台 ECS 主机,得有公网 IP,下图就是 pc ----> ECS <------ 家里的 pc

1
2
3
4
5
6
7
8
9
10
11
12
13
14
15
16
            +----------+
| |
+------->+ ECS +<-----+
| +----------+ |
| |
| |
| |
| | home
| +---+------------------+
+--++ | |
|PC | | +---+ |
+---+ | |PC | |
| +---+ |
| |
+----------------------+

当然,如果你会折腾的话 pc 可以是软路由,有兴趣和条件的可以看我博客 proxmox x86软路由笔记

登录到 ECS 上

得益于 wireguard 中没有 client/server 的概念,只要所有 nat 中的某台机器能够和 gateway 主机建立连接,即可实现共享所有节点的网络资源。这里 ECS 有公网ip,所以担当 gateway

安装 wireguard

官方安装文档 ,或者查看 如何在五分钟内装好 WireGuard? ECS 是 linux 系统的话内核要5.x以上,没有就升级下内核,其他个人 pc 电脑则下载客户端,当然软路由的话则去找个带 wireguard的固件。

centos7

1
2
3
4
5
6
7
8
9
10
11
12
13
14
15
16
17
18
19
20
21
22
23
24
25
26
27
28
29
yum -y install https://www.elrepo.org/elrepo-release-7.0-4.el7.elrepo.noarch.rpm
rpm --import https://www.elrepo.org/RPM-GPG-KEY-elrepo.org
yum --enablerepo=elrepo-kernel install -y kernel-lt

yum -y --enablerepo=elrepo-kernel install kernel-lt-{devel,headers,perf}
# 失败就加 --skip-broken


awk -F\' '$1=="menuentry " {print i++ " : " $2}' /etc/grub2.cfg

#看数字
grub2-set-default 2
grub2-mkconfig -o /etc/grub2.cfg
reboot

yum install dkms kmod-wireguard wireguard-tools

reboot

modprobe wireguard
# 查看下能否加载模块
lsmod | grep wireguard
# 增加模块开机导入
echo wireguard > /etc/modules-load.d/wireguard.conf

# 设置开机器自启
systemctl enable wg-quick@wg0.service
systemctl daemon-reload

配置

开启转发

1
sysctl -w net.ipv4.ip_forward=1
1
cd /etc/wireguard

生成密钥对

wg 的每个互相之间要一对密钥,例如 A 连 gateway, A 需要 gateway的公钥,gateway 需要 A 的公钥,不能共用一套密钥对。

生成 gateway 的密钥对

1
wg genkey | tee gw-privatekey | wg pubkey > gw-publickey

生成个人电脑的密钥对

1
wg genkey | tee pc-privatekey | wg pubkey > pc-publickey

生成家里电脑的密钥对

1
wg genkey | tee home-pc-privatekey | wg pubkey > home-pc-publickey

配置文件

wg 的组网得定义一个网段,这个网段和你所有运行了 wg 的局域网的 ip 不能一样,例如我定义的是 10.1.0.1/24,ecs 上配置文件为:

1
2
3
4
5
6
7
8
9
10
11
12
13
14
15
16
17
18
19
20
21
22
cat > wg0.conf <<EOF
[Interface]
ListenPort = 16000 # 客户端连过来填写的端口,安全组的tcp和udp都要放行
Address = 10.1.0.1/24 #wg之前通信组网的内网ip和段
PrivateKey = $(cat gw-privatekey) # 使用 shell 读取gateway的私钥到这里
# 下面两条是放行的iptables和MASQUERADE
PostUp = iptables -A FORWARD -i %i -j ACCEPT; iptables -A FORWARD -o %i -j ACCEPT; iptables -t nat -A POSTROUTING -o eth0 -j MASQUERADE
PostDown = iptables -D FORWARD -i %i -j ACCEPT; iptables -D FORWARD -o %i -j ACCEPT; iptables -t nat -D POSTROUTING -o eth0 -j MASQUERADE

# pc
[Peer]
PublicKey = $(cat pc-publickey)
AllowedIPs = 10.1.0.2/32

# home-pc
[Peer]
PublicKey = $(cat home-pc-publickey)
# wg 接口进来的下面的这些段发往 home-pc
# 例如下面的个人pc 定义这些网段走 wg,然后会发到 ecs,因为这块内容是 ecs 的 wg 配置,ecs会把请求发到 home-pc 那去
AllowedIPs = 10.1.0.3/32, 192.168.2.0/24, 10.243.0.0/16, 10.76.6.0/24, 172.13.0.0/16

EOF

然后是每个客户端的配置文件,下面是我笔记本 wg 的客户端软件配置文件内容。

1
2
3
4
5
6
7
8
9
10
11
12
13
cat > pc.conf <<EOF
[Interface]
PrivateKey = $(cat pc-privatekey)
Address = 10.1.0.2/24 #wg之前通信组网的内网ip和段,主机位每个得不一样
# DNS = 192.168.2.3

[Peer]
PublicKey = $(cat gw-publickey) # gateway的公钥
# pc 上访问下面的这些段都会发往 ecs 上的 wg
AllowedIPs = 10.1.0.0/24, 192.168.2.0/24, 10.243.0.0/16, 10.76.6.0/24, 172.13.0.0/16
Endpoint = $(curl -s ip.sb):16000 #gateway 公网ip和端口
PersistentKeepalive = 10 # 心跳时间
EOF

家里的电脑 wg 配置文件

1
2
3
4
5
6
7
8
9
10
11
cat > home-pc.conf <<EOF
[Interface]
PrivateKey = $(cat home-pc-privatekey)
Address = 10.1.0.3/24 #wg之前通信组网的内网ip和段,主机位每个得不一样

[Peer]
PublicKey = $(cat gw-publickey) # gateway的公钥
AllowedIPs = 10.1.0.0/24
Endpoint = $(curl -s ip.sb):16000 # gateway 公网ip和端口
PersistentKeepalive = 10 # 心跳时间
EOF

然后把 pc.confhome-pc.conf 的内容拷贝到对应的 wg 客户端软件里。

讲解下配置文件,家里的台式机 proxmox 里有软路由,并不是上面我说的 pc,这样我接入的设备也可以访问。我个人是推荐搞个 proxmox 整虚拟机和软路由。

家里的路由器网段是 192.168.2.0/24192.168.2.3是软路由,主要是上面有dns server(adguard home),家里整个网络上添加 hosts 我是直接在dns server上添加的。所以我个人PC那里写了 DNS = 192.168.2.3,这样 dns 解析都走到家里的软路由上,不需要本地配置 hosts。

10.243.0.0/16, 10.76.6.0/24, 172.13.0.0/16 的网段都是家里的内网网段。AllowedIPs意思就是把请求目的 IP 是这些网段的,都发到 wg0 这个接口上,也就是添加路由表。这样我在外面哪里,我个人 pc 打开 wg 后,就能访问这些内网网段了。

不要在一些云厂商上使用 100.64.0.0/10 网段, 如果你有兴趣查询了该地址段, 那么你应该明白它叫 CGNAT; 很不幸的是例如 Aliyun 底层的 apt 源等都在这个范围内, 可能会有一些奇怪问题。

ECS上启动 wg 和停止 wg

1
2
3
wg-quick up wg0 #默认取 /etc/wireguard/$name.conf
# 指定配置文件启动 wg-quick up /etc/wireguard/wg0.conf
wg-quick down wg0

PostUp 和 PostDown 就是启动后和停止后的命令,是 Linux 的话就推荐写 iptables 放行转发和做 NAT。

查看组网状态,shell 上 wg 回车即可

1
2
3
4
5
6
7
8
9
10
11
12
13
14
15
16
17
$ wg
interface: wg0
public key: FZcFhf0eq2yFgXPNBqYnpoZHnzmgFI7JCLp/5vn1DG0=
private key: (hidden)
listening port: 16000

peer: OtydRPJDt+H8upZDz5zJueRjUQ0tS4tr9P6w4BL2+w0=
endpoint: xxxxxxxxxxx:53956
allowed ips: 10.1.0.3/32, 192.168.2.0/24, 10.243.0.0/16, 10.76.6.0/24, 172.13.0.0/16
latest handshake: 1 minute, 2 seconds ago
transfer: 485.48 MiB received, 55.88 MiB sent

peer: VkhLdmaPS2KmhlSOrPk1XS1MWZrhb+00BdsC0swUBhk=
endpoint: xxxxxxxxxx:13545
allowed ips: 10.1.0.2/32
latest handshake: 21 minutes, 25 seconds ago
transfer: 56.11 MiB received, 476.83 MiB sent

一些注意点

  • 如果是软路由,开了 pxsswxll 代理之类的,记得把 ECS 的 公网IP 设置为不走代理。
  • openwrt 运行 wireguard 的话:网络防火墙常规设置常规设置转发 设置为接受
  • openwrt 的 wg0 接口推荐添加一个 wg0 的 firewall zone,然后 zone 里修改,允许转发到 lan(或者全部勾选上)。这个 zone 开 动态伪装 和 mss 。

死亡回环

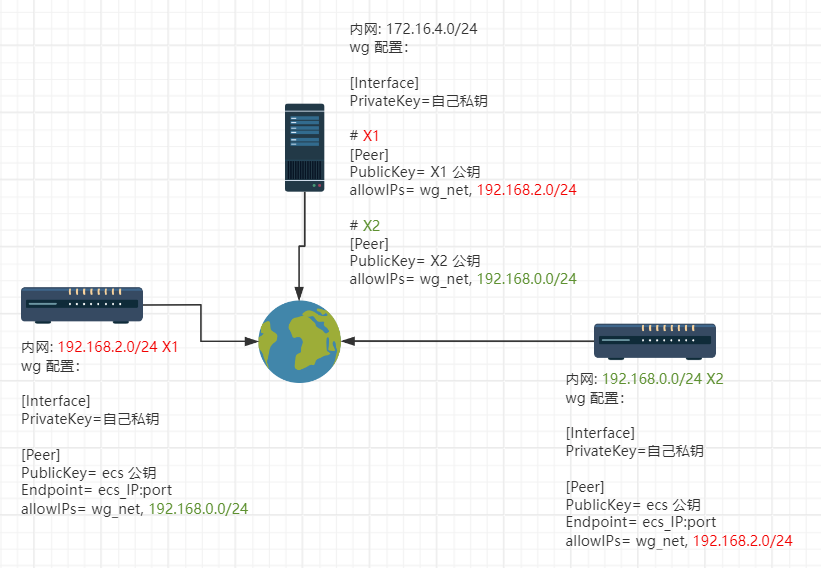
如果你有 N 个局域网组网,假设 A 设备上 wg 能连到 B 局域网,然后你把 A 带到 B 的局域网内,只要 A 分配到了 B 局域网 IP ,默认路由和 A 上 wg 的路由都包含 B 的网段,你会抓包发现包发过去没有回应(也就是你无法网络上通到这个A设备,ssh啥的都不行)。避免这种办法有个优雅手段就是在 A 设备拿到 B 局域网之前提前准备好 hotplug。也可以用 fmark 避免这种问题。

1
2
3
4
5
6
7
8
9
10
11
12
13
14
15
cat > /etc/hotplug.d/iface/50-wg << 'EOF'
#!/bin/sh
if [ "ifup" = "$ACTION" ] && [ "$INTERFACE" = "wg0" ]; then
# 设备在 192.168.101.0/24 网段内 wg 不代理 192.168.101.0/24,否则代理 192.168.101.0/24
if ip -4 a s | grep -Eq 192.168.101. && uci show network.@wireguard_wg0[0] | grep -Eq 192.168.101.0 ;then
uci del_list network.@wireguard_wg0[0].allowed_ips='192.168.101.0/24'
ip route delete 192.168.101.0/24 dev wg0
else
uci add_list network.@wireguard_wg0[0].allowed_ips='192.168.101.0/24'
ip route add 192.168.101.0/24 dev wg0
fi
# 测了下 commit network 并不会触发 ifup wg从而死循环,所以上面临时操作下路由表
uci commit network
fi
EOF

udp 被 qos 下配合 udp2raw 使用

udp 没 TCP 的流控,所以会被运营商 qos 很正常,实际使用中很大几率遇到 udp 被 qos 了,导致连接经常断开,这里使用 udp2raw 把 udp 报文伪装成 tcp 避免被 qos。这里我使用 docker 部署的,实体进程和相关文档见 udp2raw运行

Linux server端 (这里包括后面的端口 86 可能运营商会被封,尽量使用数字大的作为端口):

1
2
3
4
5
6
7
8
9
10
11
12
13
14
# 监听86的tcp端口,把86端口收到的伪装成tcp的udp报文转发到 127.0.0.1:16000 上
docker run \
-d --name udp2raw \
--restart always \
--net host \
--cap-add NET_RAW \
--cap-add NET_ADMIN \
-v /run/xtables.lock:/run/xtables.lock \
zhangguanzhang/udp2raw \
-s -l 0.0.0.0:86 \
-r 127.0.0.1:16000 \
-k passwd123 \
--raw-mode faketcp \
--cipher-mode xor -a

Linux或者软路由系统 client 端,软路径 openwrt 的话 iptables 的锁文件是位于 /var/run/xtables.lock,常规系统是 `/run/xtables.lock :

1
2
3
4
5
6
7
8
9
10
11
12
13
# 监听16000的 udp 端口,把16000端口收到的udp报文伪装成tcp发到 <public_ip>:86 上
docker run --net host \
-d --name udp2raw \
--restart always \
--cap-add NET_RAW \
--cap-add NET_ADMIN \
-v /var/run/xtables.lock:/run/xtables.lock \
zhangguanzhang/udp2raw \
-c -l 0.0.0.0:16000 \
-r <public_ip>:86 \
-k passwd123 \
--raw-mode faketcp \
--cipher-mode xor -a

windows 安装 pcap,udp2raw 运行需要依赖 pcap,如果你安装了 wireshark 之类的勾选了就不用安装,没有就安装下
windows 客户端下载,运行命令参考:

1
./udp2raw_mp.exe -c -l 0.0.0.0:16000 -r <public_ip>:86 -k passwd123 --raw-mode faketcp --cipher-mode xor

所有 client 端的 [peer] 部分里之前连云主机的 ip 都写成127.0.0.1:16000,这样 wg 客户端是先向本地的 udp2raw 客户端发 udp 报文,然后报文被封装成 tcp 发往云主机上的 udp2raw server,再到 wg server 上。

客户端和云主机上 的 wg 的 mtu 设置成 1280(网上有写1200的,但是 windows 的 wg 客户端无法启动,邮件询问作者说最小 1280 才能启动)。例如我路由器配置

1
2
3
4
5
6
7
[Interface]
...
MTU = 1280
[Peer]
...
Endpoint = 127.0.0.1:16000
PersistentKeepalive = 10

windows的 wg 目前 Endpoint必须写本机的 ip(ipconfig命令查看),不能写127.0.0.1,否则无法连 peer(日志会一直刷Failed to send handshake initiation write udp4 0.0.0.0:xxx->127.0.0.1:16000: wsasendto: The requested address is not valid in its context),这个 bug 已经反馈给作者了。

udp2raw 的 client 连上 server 后,双方都会打印下面日志:

1
2
3
4
# server
changed state to server_ready
# client
changed state from to client_handshake2 to client_ready

qos

但是也不是说你用了 udp2raw 就能百分之百能用,不同两个地方(或者说小区)俩 udpraw 使用同一个参数连云主机,可能一个能连一个不能连。比如你 A 和 B 同时 udp2raw 连你的云主机,A 可以 B 不可以,这种情况可以考虑换下 --raw-mode--seq-mode ,有的可能 faketcp,有的可能 udp ,有的可能 icmp

1
2
3
4
5
6
7
8
9
10
11
12
13
14
15
16
17
18
19
20
21
22
23
24
25
26
27
28
29
30
31
32
33
34
35
36
37
38
39
40
41
42
43
44
45
46
47
48
49
50
51
52
usage:
run as client : ./this_program -c -l local_listen_ip:local_port -r server_address:server_port [options]
run as server : ./this_program -s -l server_listen_ip:server_port -r remote_address:remote_port [options]

common options,these options must be same on both side:
--raw-mode <string> available values:faketcp(default),udp,icmp and easy-faketcp
-k,--key <string> password to gen symetric key,default:"secret key"
--cipher-mode <string> available values:aes128cfb,aes128cbc(default),xor,none
--auth-mode <string> available values:hmac_sha1,md5(default),crc32,simple,none
-a,--auto-rule auto add (and delete) iptables rule
-g,--gen-rule generate iptables rule then exit,so that you can copy and
add it manually.overrides -a
--disable-anti-replay disable anti-replay,not suggested
--fix-gro try to fix huge packet caused by GRO. this option is at an early stage.
make sure client and server are at same version.
client options:
--source-ip <ip> force source-ip for raw socket
--source-port <port> force source-port for raw socket,tcp/udp only
this option disables port changing while re-connecting
other options:
--conf-file <string> read options from a configuration file instead of command line.
check example.conf in repo for format
--fifo <string> use a fifo(named pipe) for sending commands to the running program,
check readme.md in repository for supported commands.
--log-level <number> 0:never 1:fatal 2:error 3:warn
4:info (default) 5:debug 6:trace
--log-position enable file name,function name,line number in log
--disable-color disable log color
--disable-bpf disable the kernel space filter,most time its not necessary
unless you suspect there is a bug
--dev <string> bind raw socket to a device, not necessary but improves performance
--sock-buf <number> buf size for socket,>=10 and <=10240,unit:kbyte,default:1024
--force-sock-buf bypass system limitation while setting sock-buf
--seq-mode <number> seq increase mode for faketcp:
0:static header,do not increase seq and ack_seq
1:increase seq for every packet,simply ack last seq
2:increase seq randomly, about every 3 packets,simply ack last seq
3:simulate an almost real seq/ack procedure(default)
4:similiar to 3,but do not consider TCP Option Window_Scale,
maybe useful when firewall doesnt support TCP Option
--lower-level <string> send packets at OSI level 2, format:'if_name#dest_mac_adress'
ie:'eth0#00:23:45:67:89:b9'.or try '--lower-level auto' to obtain
the parameter automatically,specify it manually if 'auto' failed
--wait-lock wait for xtables lock while invoking iptables, need iptables v1.4.20+
--gen-add generate iptables rule and add it permanently,then exit.overrides -g
--keep-rule monitor iptables and auto re-add if necessary.implys -a
--hb-len <number> length of heart-beat packet, >=0 and <=1500
--mtu-warn <number> mtu warning threshold, unit:byte, default:1375
--clear clear any iptables rules added by this program.overrides everything
--retry-on-error retry on error, allow to start udp2raw before network is initialized
-h,--help print this help message

一个注意点

openwrt 上在接口 添加 wireguard 接口,然后 peer 那里的 ip 写 127.0.0.1(也就是openwrt上的udp2raw的ip)可能不行,换成 openwrt 的 局域网 ip 试下

参考:

CATALOG
  1. 1. 登录到 ECS 上
    1. 1.1. 安装 wireguard
      1. 1.1.1. centos7
    2. 1.2. 配置
    3. 1.3. 生成密钥对
    4. 1.4. 配置文件
    5. 1.5. 一些注意点
    6. 1.6. 死亡回环
  2. 2. udp 被 qos 下配合 udp2raw 使用
    1. 2.1. qos
    2. 2.2. 一个注意点
  3. 3. 参考: